Tips to Declutter and Organize Before a Kitchen Remodel

A kitchen remodel can significantly disrupt your day-to-day life. So, before you start dreaming about improving your kitchen with the perfect kitchen color palette, it makes sense to declutter and organize before a kitchen remodel. 

Making this kind of effort before the remodel will allow you to approach the renovation in carefully planned out stepsYou will be able to dismantle everything before the construction work starts, but also organize everything perfectly after the kitchen renovation. So, let’s take a look at a few organizational tips to make your kitchen declutter as effective as possible

Remove the kitchen utensils first

A good kitchen declutter may start from the kitchen cabinets and drawers. Interestingly, people usually associate decluttering their home with paring down their clothing or family belongings. As a result, kitchen utensils and appliances tend to pile up without you even noticing. This happens mostly because they seem less expendable than for instance clothes or toys. 

However, just think about the number of old or useless appliances you keep stacking up in your kitchen cabinets. There is really no need to keep holding on to your old bread toaster when you have bought a new one. 

Throw away anything you have not used in a while.

The same goes for kitchen utensils and silverware. Yes, they are an essential part of your household, but you just might have too many to ever find use for. And now is the time to figure out what stays and what goes out. What should you do with those items? Organize a yard sale or a charity giveaway for the items you decide are just superfluous. 

Declutter and organize all kitchen items separately into labeled boxes 

Once you finish the decluttering of the kitchen utensils and appliances, organizing them and packing them into boxes should be a breeze. So, instead of throwing everything into a single box, it makes more sense to have smaller boxes with appropriate labels. 

Hence, designate a single box for pans, another one (with three or four compartments) for utensils, a third one for your mixer. 

At this point this might seem unnecessarily complicated, but you will be thankful to yourself in the end. This kind of organization allows you to find anything you may need while your kitchen is being remodeled. In addition, you will be able to just pull everything out of a box and restore everything to its designated spot after you finish the renovations. Nothing mixed up or lost – less stress for you. 

a woman cooking after a kitchen remodel

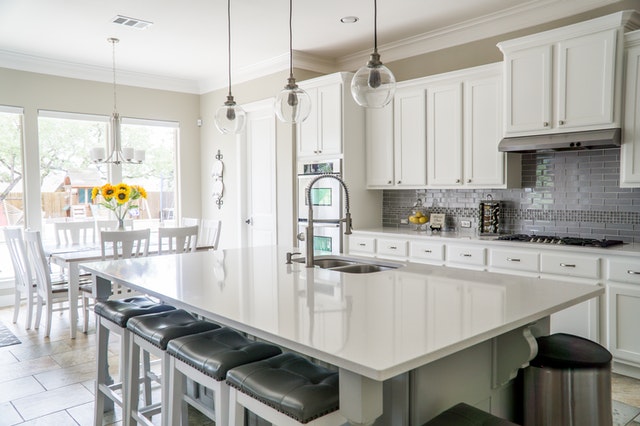
With proper organization, you will be able to use your kitchen right after the remodel.

During the home renovations, you may even rent a storage unit if you do not have enough space to keep the boxes in your kitchen or your home. In this case, a short-term solution might be good since you will be able to free up the kitchen and let the workers do their job without any obstructions or distractions.

As for family silverware and other items you might attach certain emotions or memories to, you can pack them securely in an air-sealed box to avoid exposing them to moisture or mold. 

Make categories for similar items

Just as with kitchen utensils and appliances, it helps to have clear-cut categories for other items that you keep in your kitchen. For instance, you may have a cereal box or spices category, or one for canned foods and sauces. 

Of course, you may not have to do this if you have a well-organized pantry or a kitchen island. However, decluttering and recategorizing your foodstuff before a kitchen remodel can be extremely helpful. There are simply no more excuses not to throw away expired food that has been laying in the back of the drawers for ages. 

Also, you may decide to temporarily store your kitchen items in a storage unit. This is something many homeowners make use of when they are remodeling their kitchen. If you decide to do the same, take note that some things shouldn’t stay there for more than a few days or weeks. So, some foods should not be kept in a storage unit since they may rot. Since you surely want to avoid having to clean or pay damages to the storage service provider, make sure you know what you can and cannot store in a storage unit. 

Designate one box for frequently used items

So far we have mainly discussed how to declutter and organize before a kitchen remodel by focusing on the phases before and after the remodel. However, what if you plan to stay in your home during the renovations? 

Essentially, it helps to have a single box for items that you use on a daily basis. Rummaging through boxes to find your vegetable peeler might destroy all of your previous efforts to declutter and organize your kitchen. When you have such a box or cabinet, you will know where to find what you need immediately. This will save you a lot of trouble since it eliminates the need to surround yourself with boxes. 

You will probably need many items from your kitchen, but you might not be able to enter the kitchen while it is being renovated. That is why it makes sense to pull everything out of the cabinets and other storage spaces. 

a newly renovated kitchen

Empty the kitchen cabinets completely to make things easier for you during and after the remodel.

Also keep in mind that your appliances or items might get damaged if they remain in the kitchen during the remodel. So, if you drink coffee on a daily basis, you should place the coffee maker in your living room. 

All in all, we hope this short guide will be helpful when you start to declutter and organize before a kitchen remodel. We strongly suggest you take the time to do so since it will make organizing your newly renovated kitchen much quicker and enjoyable. 

Did you miss our previous article…
https://distancebetweenplaces.com/?p=229

What Are The 3 Different Types Of Generators?

Electric generators are considered to be lifesavers. They are backup power sources that convert fuel supply—usually propane, diesel, or gasoline, into electrical energy. They are the primary sources of electrical supply during power outages. This energy is used in an external circuit. Unlike standby generators, the following are not permanently installed in one place, so they’re easy to start.

There are three main types of generators: portable, inverter, and standby. Despite their differences, all these generators should undergo similar generator maintenance to ensure long-term usability, and similar safety precautions should be taken to reduce the hazards posed by their operation. You can find a good inverter generator at Sydney Tools. Let’s now see, what are the 3 different types of generators. 

Portable Generator:

A portable generator is powered by gas or diesel fuel and is used to provide temporary electrical power. One of the characteristics of the portable generator is that it can use a combustion engine to conduct electricity. Also, It can be easily plugged into electrical appliances or tools via its sockets. It can be wired into a facility’s subpanels. It can be used on remote sites. It has enough power to run a television, freezer, and refrigerator. The engine should run at 3600 rpm to render the standard 60hz of current. Use a governor to control the engine’s speed. It can also power tools and lights.

Inverter Generator:

An inverter generator uses an engine connected to an alternator to produce AC power. It also uses a rectifier unlike other generators to convert the AC power into DC power. Some of the characteristics of Inverter generator are:- It relies on high-tech magnets. Uses advanced electronic circuitry. Undergoes three phases to produce electricity. Outputs AC current converts it to DC current and finally inverts it to AC. Maintains a constant flowing of current to an appliance. Is more energy-efficient, as the engine speed adjusts itself according to how much power is needed. Its AC can be set to any voltage and frequency when used with proper equipment. Tends to be belittled and is lightweight. Can fit into a car, RV, or boat.

Standby Generator:

A standby generator is an electrical system that operates with an automatic transfer switch that commands it to power a device up during power loss. Here are some characteristics to note about these types of generators: Operates automatically. Delivers permanent power protection. Has two components: a standby generator and an automatic transfer switch.Can operate on liquid propane or natural gas.Will run on the fuel type already in use in the facility or home. Uses an internal combustion engine. Senses the power loss within seconds and boots up electricity so that power loss is felt very briefly. Executes automatic weekly self-tests to see that it is properly reacting to a power loss. Is constantly monitoring utility power. Used in safety systems for elevators, standby lighting, medical and life support equipment, and fire protection systems.

A routine maintenance practice is that of general inspection. It is important to inspect the oil as well, as it must be changed regularly. Oil change frequency depends on the manufacturer, how often the generator is used, and your work environment. 

Did you miss our previous article…
https://distancebetweenplaces.com/?p=225

Process of pool installation, Step wise

The following is a step-by-step guide on installing your swimming pool, from start to finish. When you meet with one of our designers for a free consultation and estimate, they may go through each stage in further detail.

Design

The pool designer will then take the information you provided and create a drawing of the pool in the area you specified on your property.

Layout & Excavation

This is the first step in the construction of your salt water pool The layout as well as the excavation are completed on the same day. The  construction manager and excavation crew will meet with you to plan the pool’s layout. They will begin excavating the pool after you have approved the location and elevation of the pool. This day will be used to remove any surplus soil that cannot be graded into the yard.

They will simply remove soil from the yard at this time. The location of your filter equipment and light junction boxes will also be confirmed by the construction superintendent. If you haven’t finalised your coping and tile choices yet, you’ll need to do so now to avoid any delays in  construction process. This is the day that your excavation instalment is due.

Steel Reinforcing

This is where your pool’s support structure is built. Our gunite shell gains structural strength from the steel setting. Once the steel is installed, the township will be contacted for a building inspection and a partial bonding inspection.

Gunite

It is at this point that the pool’s shell is constructed. For this part of the project, we’ll need to use your outdoor water supply. You may be required to stay for a few moments to approve the placement of any benches and your steps. This is also when the gunite instalment is due.

Plumbing

The pool plumbing and filter equipment will be installed and pressure tested on this day. This step does not require your presence because the equipment and light junction boxes were installed during the layout and excavation. If an electrician and a gas plumber are required, you are now ready.

Coping and Tile

It is now that you will see that your saltwater pool is getting finished. Your raised wall’s coping and tiling, as well as, if necessary, the facestone, will be installed. You do not require to be present for this stage once again.

Electric and Gas

The electric and gas lines must be connected after the pool filter equipment has been installed.

Decking

The decking installation can be planned after the electric and gas connections have been examined.

If you hire your own decking contractor, it is your decking contractor’s job to ensure that the decking is not completed until all necessary inspections have been conducted, such as gas and electric trenches, and bonding. It is also your concern that the installed decking does not surpass or impact on any township setbacks or limits and that the amount of decking does not exceed any lot covering totals. Backfilling any ditches that may be in the way of installing the deck is the responsibility of whoever is performing the decking.

It’s also crucial that the decking system, concrete, or pavers have adequate expansion, with at least a 12″ x 4″ ethafoam expansion connection between the deck and the pool coping and shell. If you don’t get this installed, you risk damaging your pool’s coping, tile, and gunite shell, which won’t be covered under warranty.

Fencing

After the decking is finished, the fencing around your saltwater pool should be built. They can’t start filling your pool until the permanent fence is in place due to local building laws. They request that one portion of the fence be removed so that They can access the saltwater pool to plaster it.

Plastering

This is the right time to start planning your pool party. This is the last step in the saltwater pool construction process. We leave the pool to fill with your water supply after the plaster is done. DO NOT end the water from filling the pool during the filling phase. Where the water was turned off, a stain or ring may appear on the pool plaster surface. Stop filling the pool after the water reaches the centre of the tile and call the office to schedule the start-up. This is the moment to pay for the plaster.

Did you miss our previous article…
https://distancebetweenplaces.com/?p=216

Weekend Reading 10.24.21

Weekend greetings! I’m sitting in my little studio listening to the rain on the street, it’s been storming for a few days and of course we need the water but I find the sound is so comforting too.

Fall activities are filling our calendar, we had two homecoming dances this past week, there’s an upcoming Halloween soiree, and I volunteered to host Thanksgiving. We traveled last year so I’m looking forward to staying home and cooking in my own kitchen. I can’t believe November is next week. Here we go right into the holiday season!

Favorite links from the week:

The best trees to grow in pots on your patio.

What a gorgeous shade of jade green in the den in this family home.

Wow what a view! Also love the hood in this kitchen.

From dated to mid mod: this impressive kitchen remodel.

Ideas for filling empty corners of your home.

So cute: the new Lego Home Alone house.

The trick for keeping lemons fresh in the fridge for months.

These tested 700 songs are the ones that give people chills.

I’m already missing Italy reading this travel guide to all the regions.