Building An Easy Privacy Trellis (With 2 Pieces Of Wood + 1 Planter Box)

BRB, just changing the name of this blog to “Solving Problems With Plants.” And I know we promised a huge pool post, but the pool is still very much in progress. Hopefully it’ll be done next month and we can write one big breakdown with approximately 473 photos. But back to how plants can not only hide ugly stuff, they can also offer some pretty great privacy, as we’re about to demonstrate below.

One of the things that contributes to our house being extra walkable to shops, parks, the beach, and restaurants is that it’s less like a sprawling suburban neighborhood due to the lots being a good deal smaller (you can read more about why a walkable neighborhood and a smaller house/lot really appealed to our family in this post).

It’s a similar feeling to our former beach house in Cape Charles, Virginia, which taught us that we really didn’t mind being that close to other homes.

Continue reading Building An Easy Privacy Trellis (With 2 Pieces Of Wood + 1 Planter Box) at Young House Love.

Did you miss our previous article…
https://distancebetweenplaces.com/?p=392

How We Created A Cozy Fire Pit Area In Our Formerly Boring Side Yard

We’ve been enjoying this fire pit hangout spot for months now, but it hasn’t been on the blog… until today. This is basically a lesson in how a fence can make a HUGE difference in defining an area, which can lead to adding some simple outdoor furnishings (in this case, it was four adirondak chairs and a fire pit – which hit the ground and instantly created an entirely new “outdoor room” for our whole family to enjoy).

We hang out here and make s’mores at least once a week (and sometimes a lot more than that), so it has been a very welcome addition. Especially during a time when everyone is spending A LOT of time at home, so something novel and new like this bonus hangout zone feels extra special We even made s’mores for dessert on Thanksgiving and New Year’s Eve, so it’s quickly becoming quite the family tradition.

Continue reading How We Created A Cozy Fire Pit Area In Our Formerly Boring Side Yard at Young House Love.

Did you miss our previous article…
https://distancebetweenplaces.com/?p=388

Bathroom Design: Fixed Shower Panels

Yesterday I shared on my Instagram stories some progress shots on our little two bedroom flip house and created the final to-do checklist before we can list it for sale.

For both bathroom remodels, I chose single pane glass shower panels. It’s a contemporary look, but one I prefer in small to mid size bathrooms with walk in showers. These tempered glass panels are available in a few different styles: framed, frameless, screen, and etched. Installation requires U brackets secured to the wall and shower floor with added silicone on both sides of the glass to stabilize the pane.

For my shower remodels I bought two of these frameless panels in satin brass, they were a lot less expensive than a local bid I got for shower doors. I’m so pleased with how light they feel compared to the alternative of framed sliding or a hinged shower door. (And less glass to clean!) The same panels are also available here with multiple bracket finishes available.

This “barely there” frameless style works for any walk in shower where there is additional space for entry and exit beyond the panel.

Below are a few examples where other designers have installed a similar fixed shower panel. Also find budget friendly sources for a similar style if you’re planning a shower remodel in the future. 🙂

melanie beynon

eva holbrook

adore magazine

the beach people

three birds renovation

Budget Friendly Shower Glass Panels:

curved top in satin brass

matte brass frame

matte black frame


matte black grid

fluted glass

framed fluted & clear

frameless panel (U bracket in chrome, bronze, black & brass)

arched top (multiple finishes)

Did you miss our previous article…
https://distancebetweenplaces.com/?p=347

DIY Recipe Tea Towels

‘Tis the season when we’re all cooking and baking and giving gifts! Why not combine them? I thought it was finally time I rounded up some of the family’s famous recipes to commemorate them in the form of keepsake tea towels.

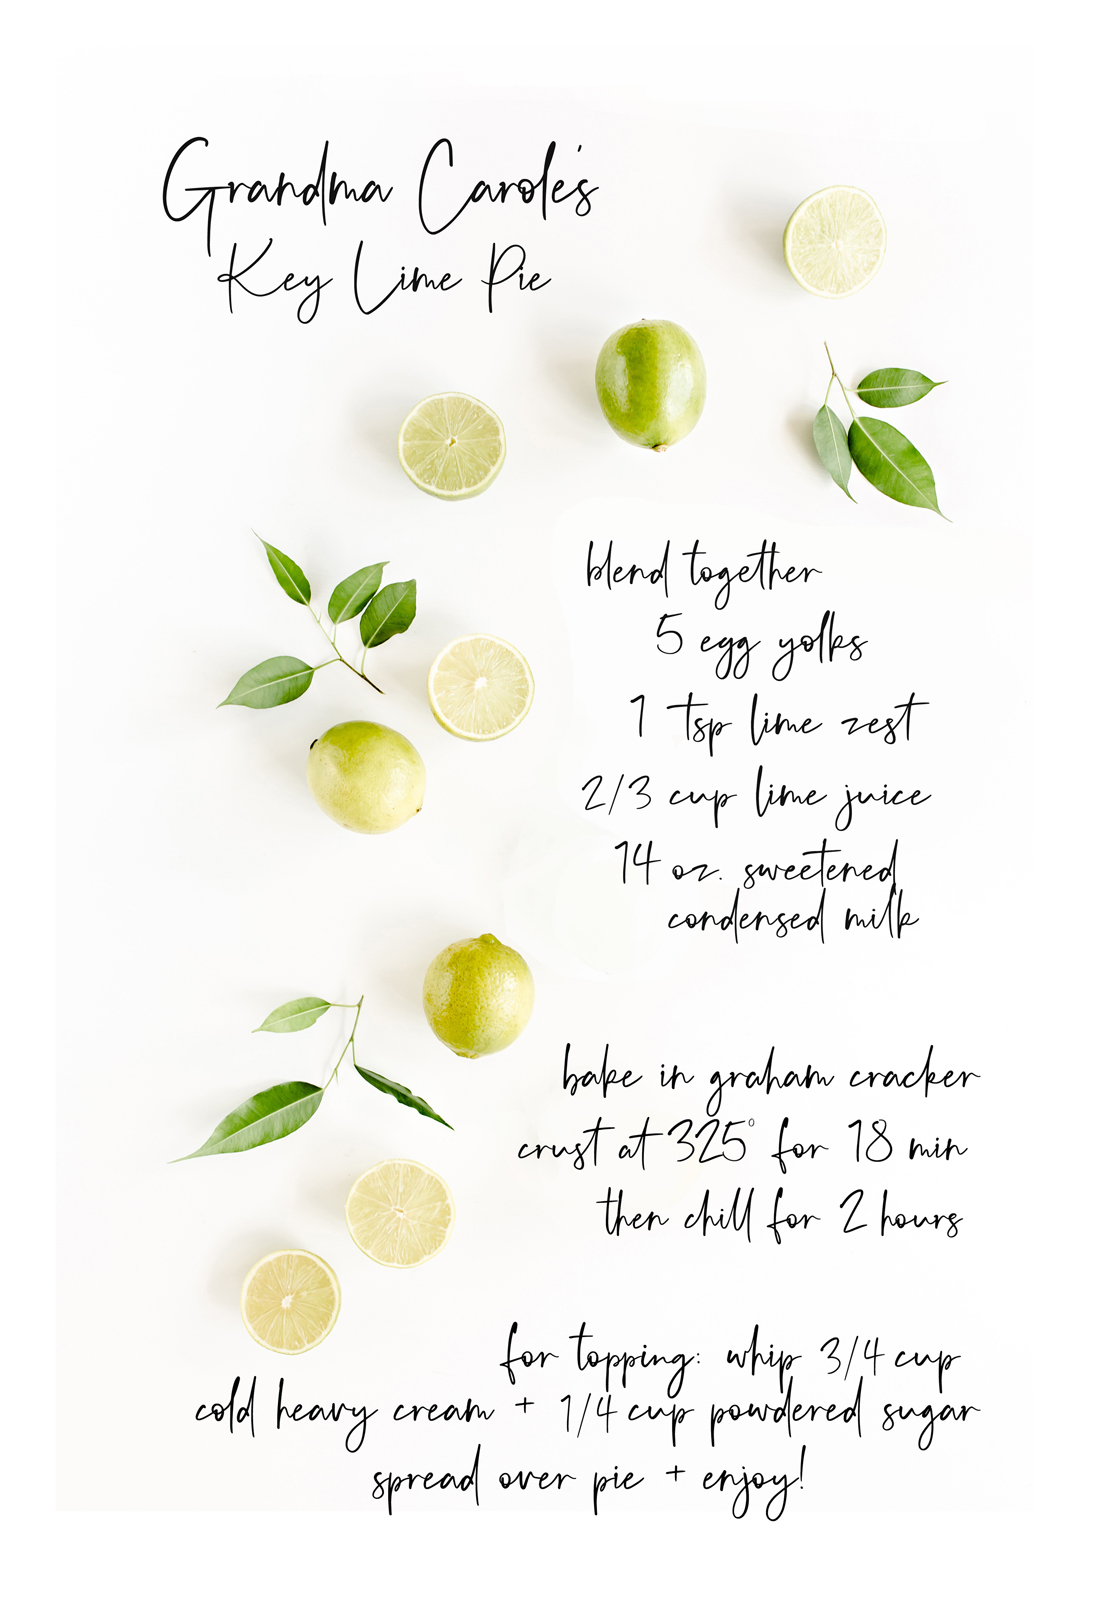
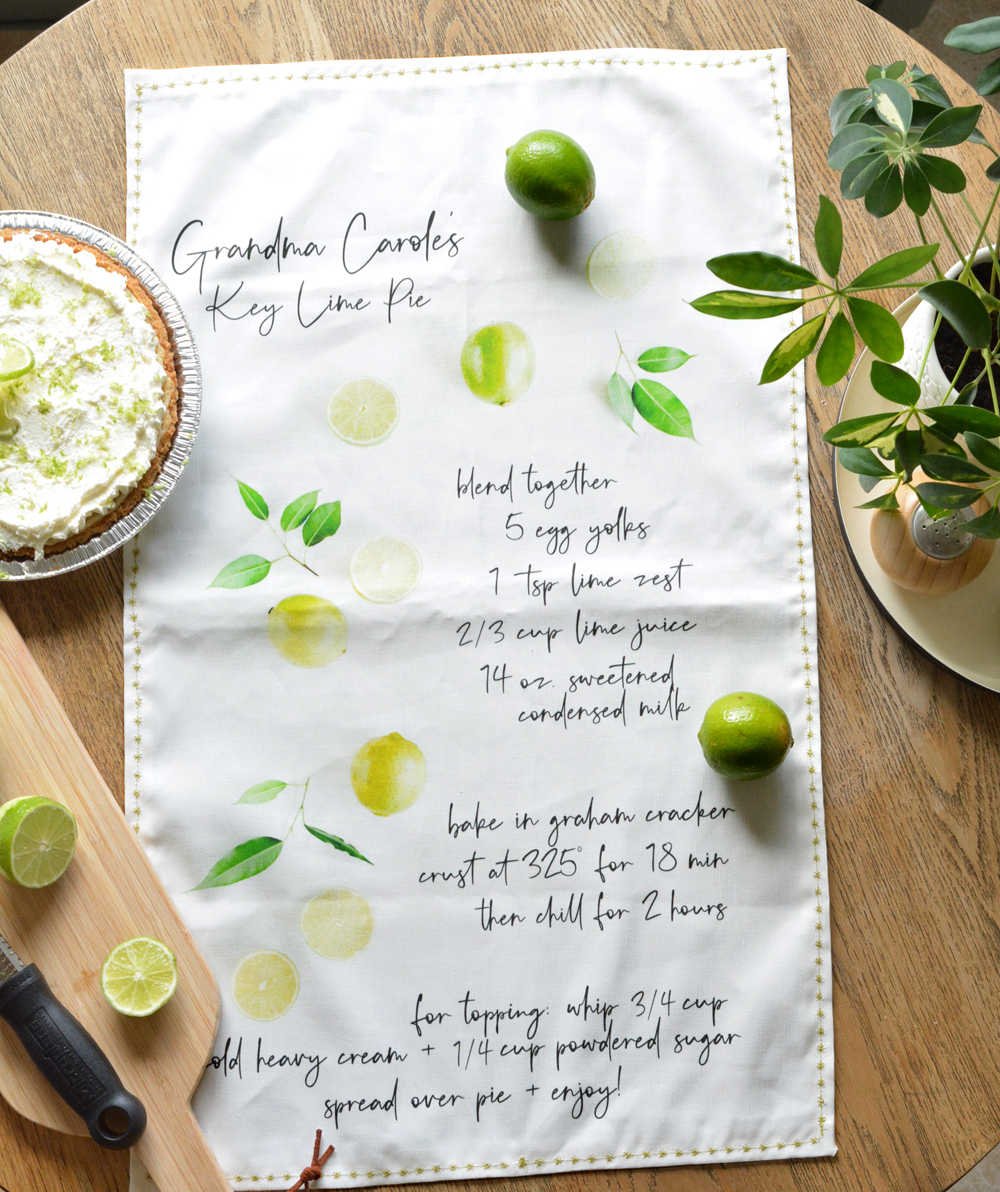
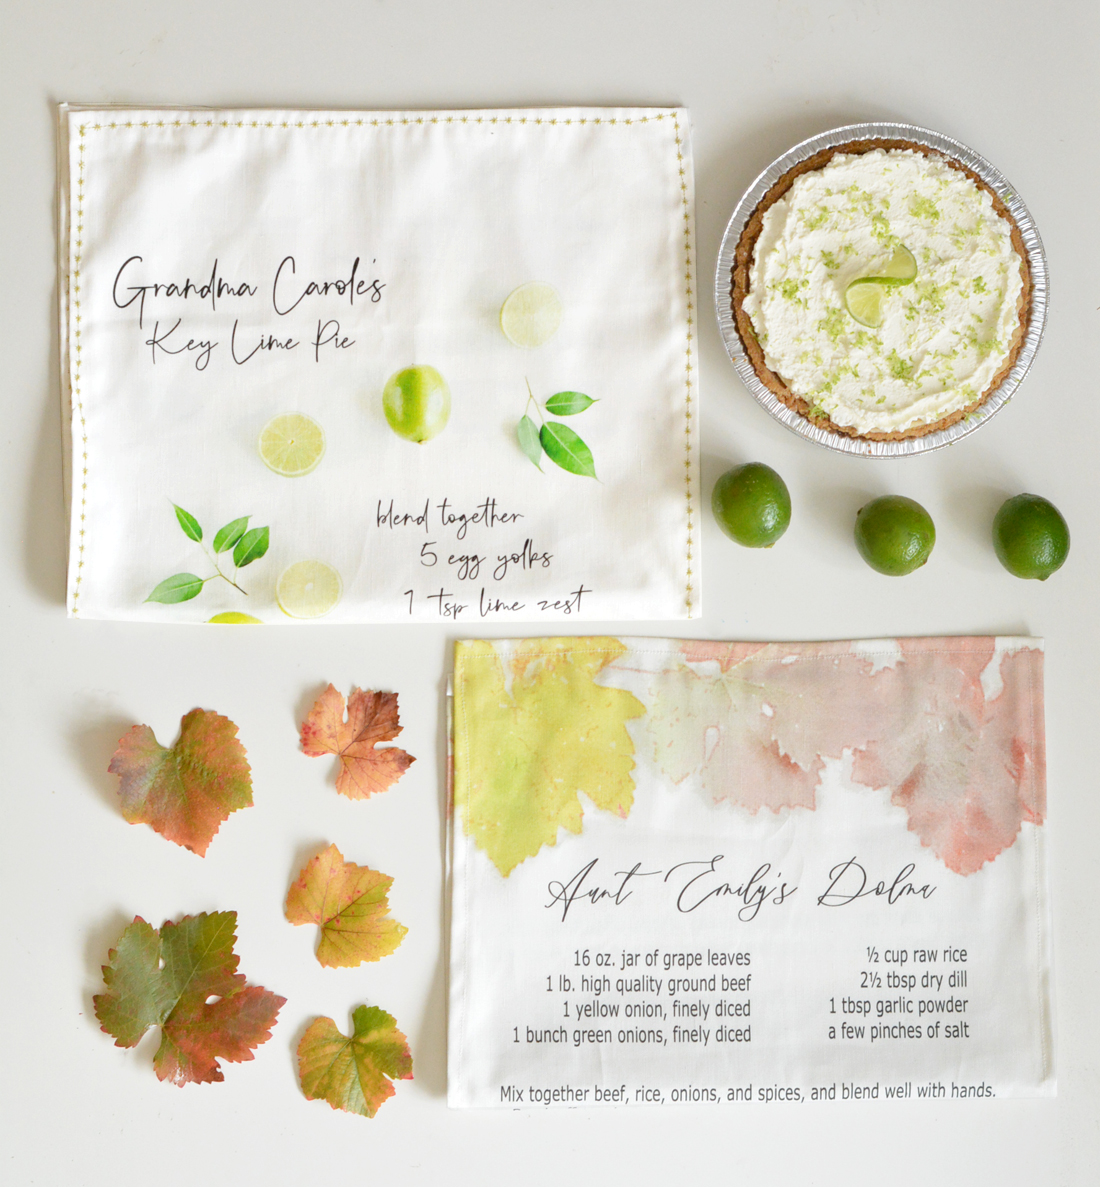
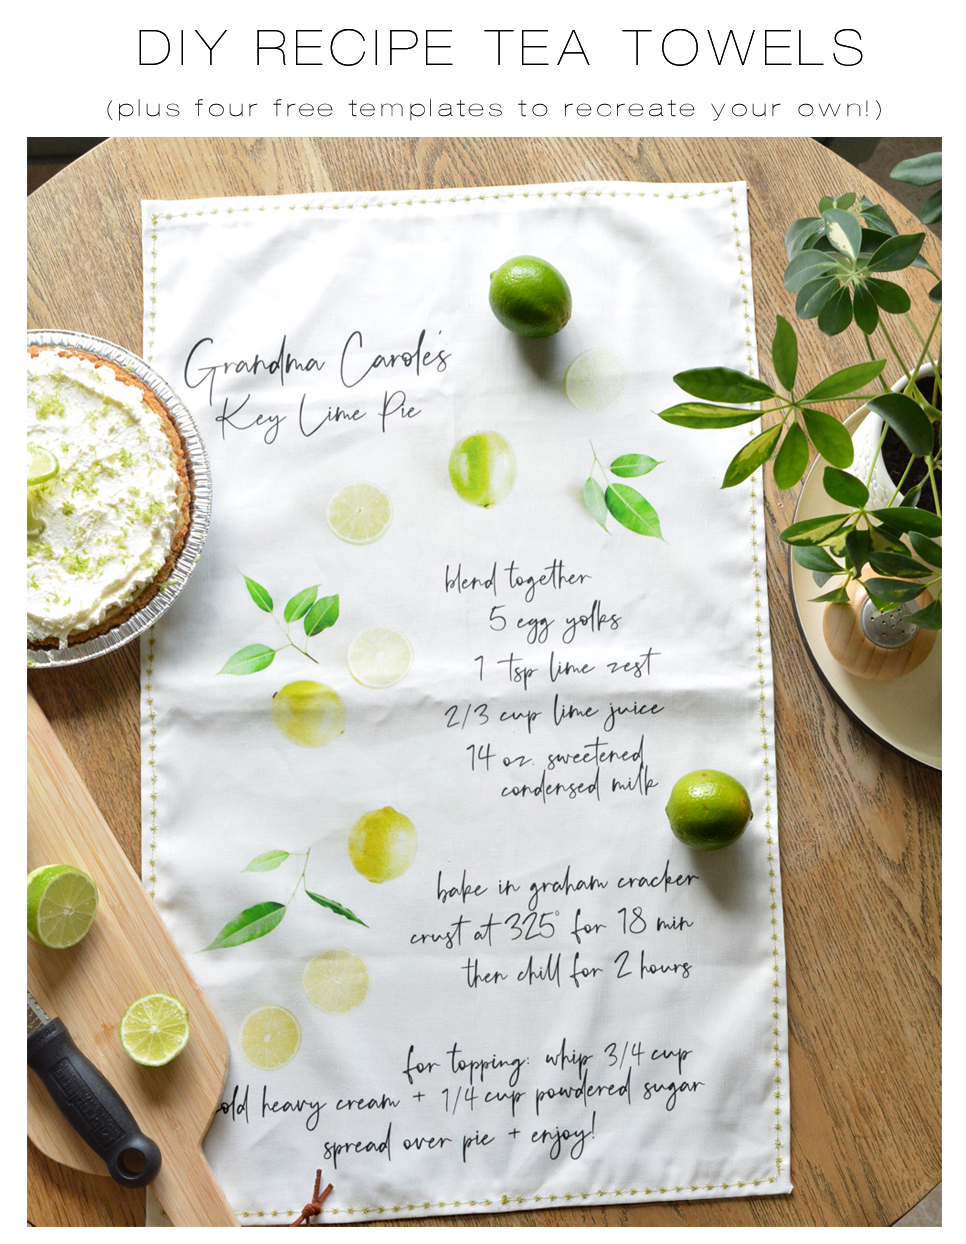
Every Thanksgiving we make Grandma Carole’s key lime pie (in addition to pumpkin), and Aunt Emily’s dolma recipe is the #1 most recommend food for all gatherings on Matt’s side of the family.

I typed the two recipes on templates I created and uploaded them to Spoonflower for printing on fabric. Once they arrived, I sewed them into keepsake tea towels to give as gifts.

This project has been around forever, and it’s such a great idea! Spoonflower wrote up an article about turning recipes into tea towels many years ago. That tutorial includes photocopies of handwritten recipes (also very charming) but for these versions I added text to .jpg templates I created. If you’re interested in more ways, this article offers variations on this idea, using Gimp or Canva and other programs.

I didn’t have the handwritten recipes and I wanted to get creative with photos and illustrations instead. For the key lime pie recipe, I turned to Canva where you can find royalty free illustrations, graphics, and photos for all your creative projects. I used this lime and leaves image for the key lime pie, and with Photoshop I eliminated a few images to create space for the recipe text. This watercolor lemon is a good image for personal use if you’re making something with lemons.


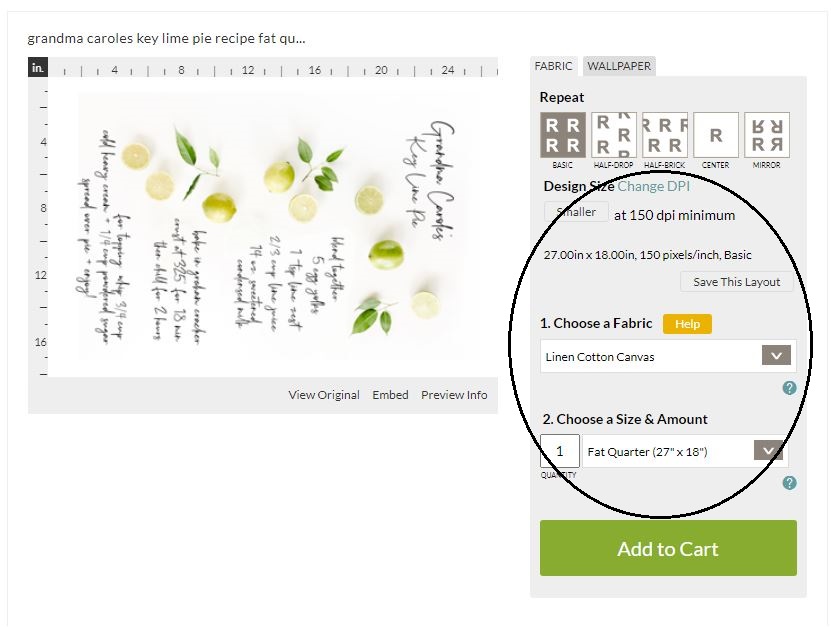
To recreate this project, you need .jpg file in the 18×27” size, which is the size of a fat quarter in the linen/cotton canvas fabric on Spoonflower, its texture and thickness work really well for tea towels.

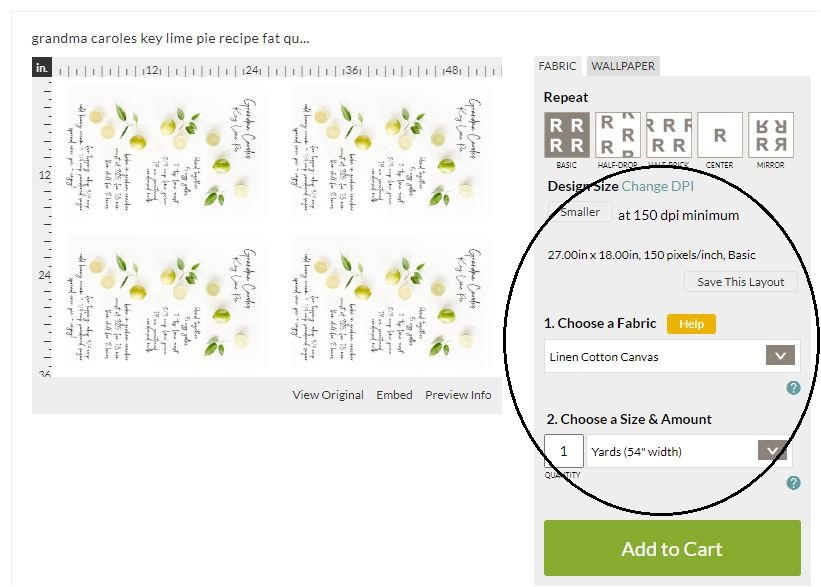
The 18×27” is the fat quarter size but if you select a full yard, you’ll get four tea towels per yard.

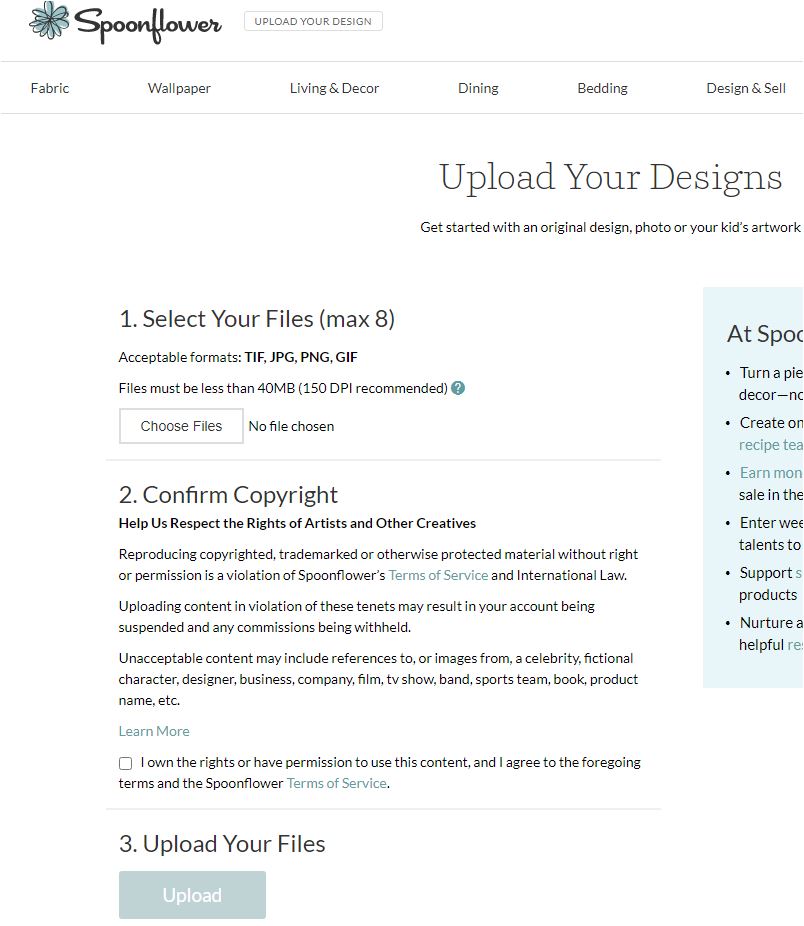
For those unfamiliar with Spoonflower, don’t worry, this project is easy to upload and print. First set up a basic account with your name and email then upload your design. For this project, a 18×27” image at 150 dpi (dots per inch) and 1 ½ inch border for seam allowance works best. (I’ve included some free templates below for your use!)


You’ll need to upload the image rotated 90 degrees.

This is how it looks on Spoonflower as a fat quarter…


…and as a full yard.

Basic shipping with Spoonflower takes about a week to arrive.

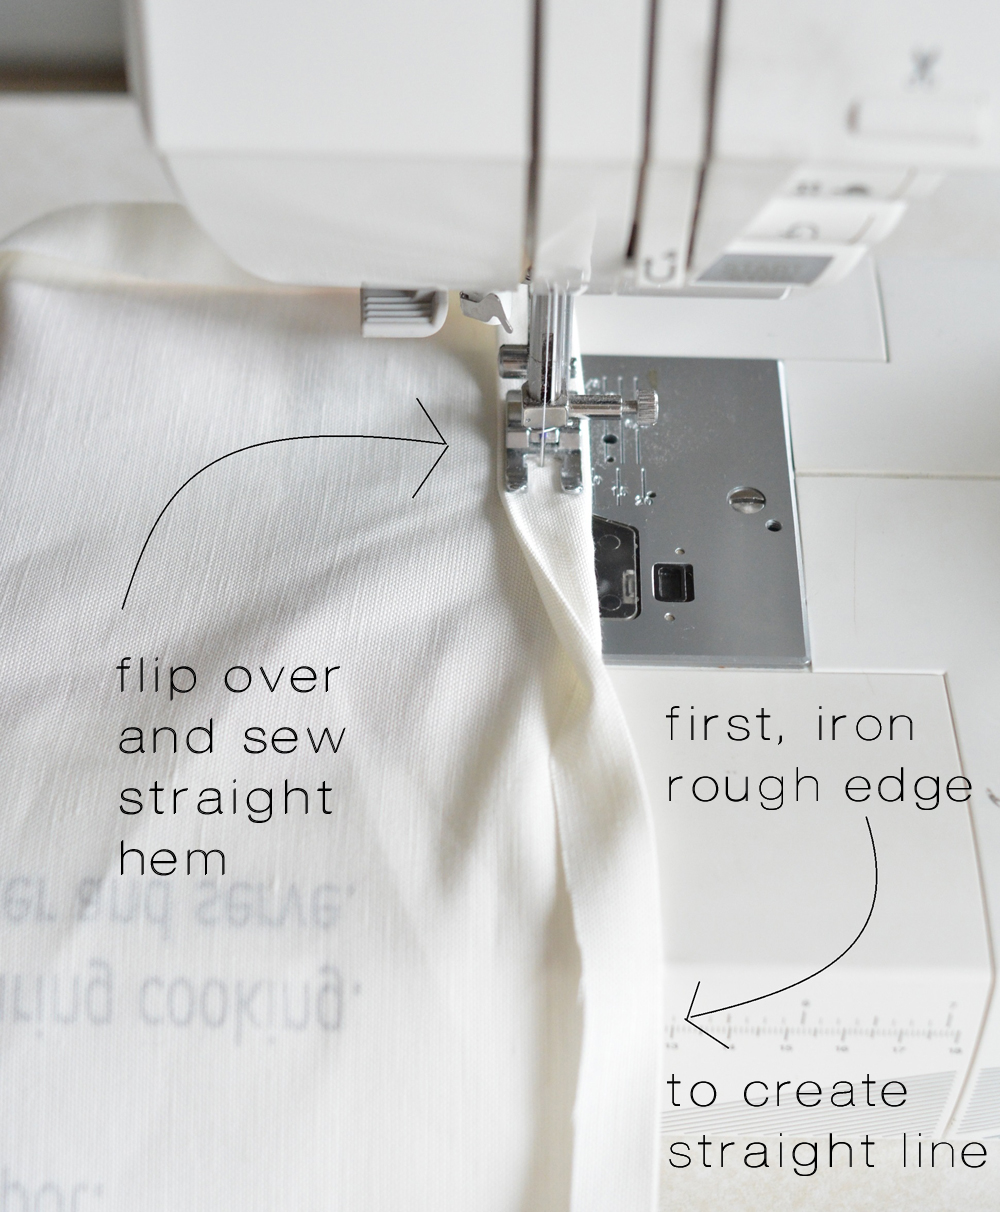
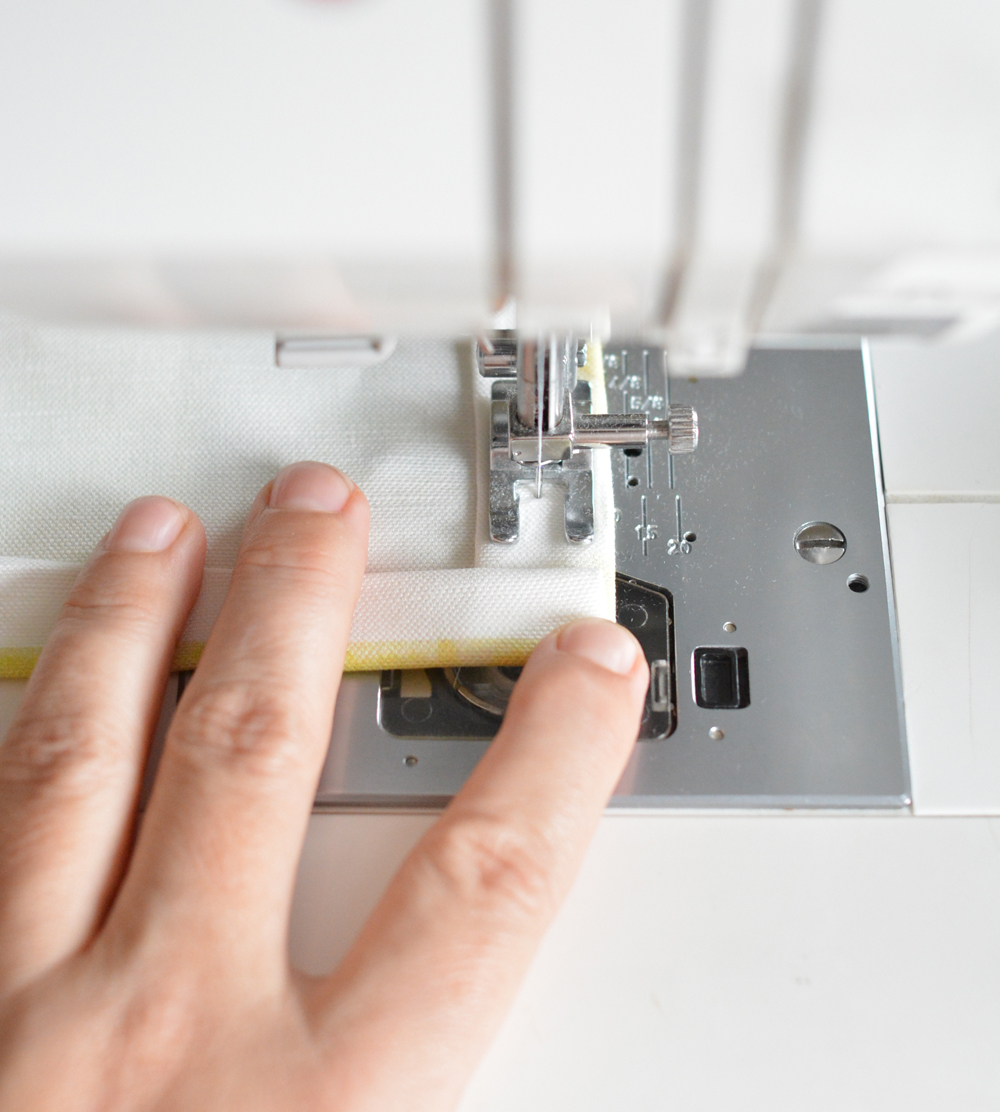
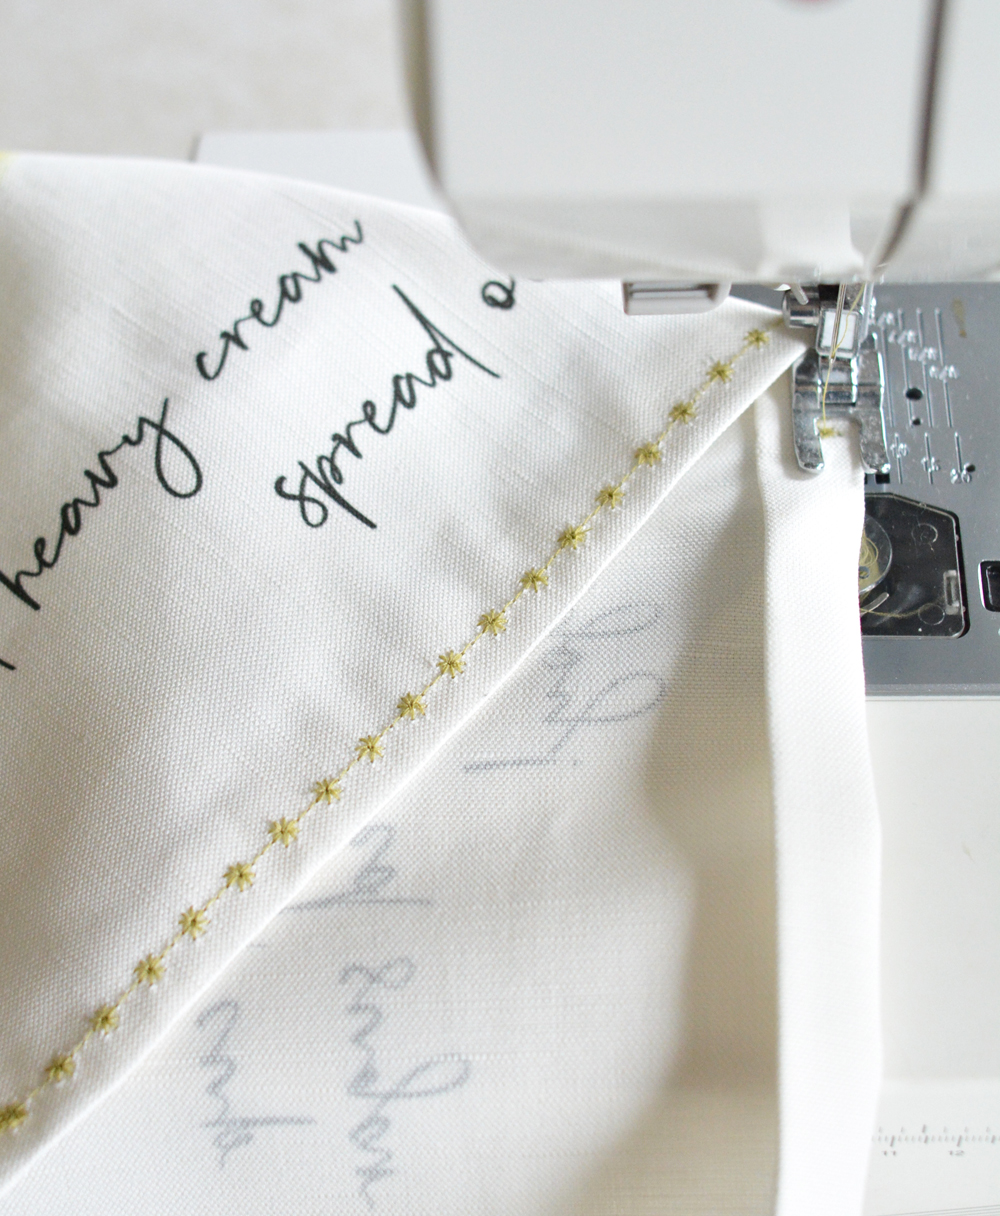
I’m a big fan of iron-on adhesive tape for various no sew projects, but because this is a tea towel that will need to go through the wash, hemming the edges with a sewing machine is recommended. But good news, it’s a straight stitch with white thread, that’s all you need to do!

For clean edges, I found folding over and ironing the rough edge 1/2 inch helped create a clean straight line, then I folded it over once more and sewed a straight line on my sewing machine.

Finish corners by folding one over the other. It helps to cut away the fabric underneath.


Or if you’ve got a sewing machine that does fancy stiches then add one of those!

I bought the Singer 9960 model about ten years ago and it’s still going strong and has never given me any problems. I use it for all my sewing projects. I used one of the many built in computerized embroidery stitches to add a decorative edge with lime green thread.

For the dolma recipe tea towel, I created a watercolor leaf motif template. I’ve linked to it below for your use!

For your personal use, below are four tea towel templates you can use for this project! Each one has an approximate 1½” white border to allow for hemming the edges.

Click on the text links (not the template images) to download the full resolution templates to your desktop, laptop, tablet, or phone.

Happy creating!

18×27” tea towel templates (with white border/seam allowance)

Holiday Berries 18×27” template

Winter Plaid 18×27” template


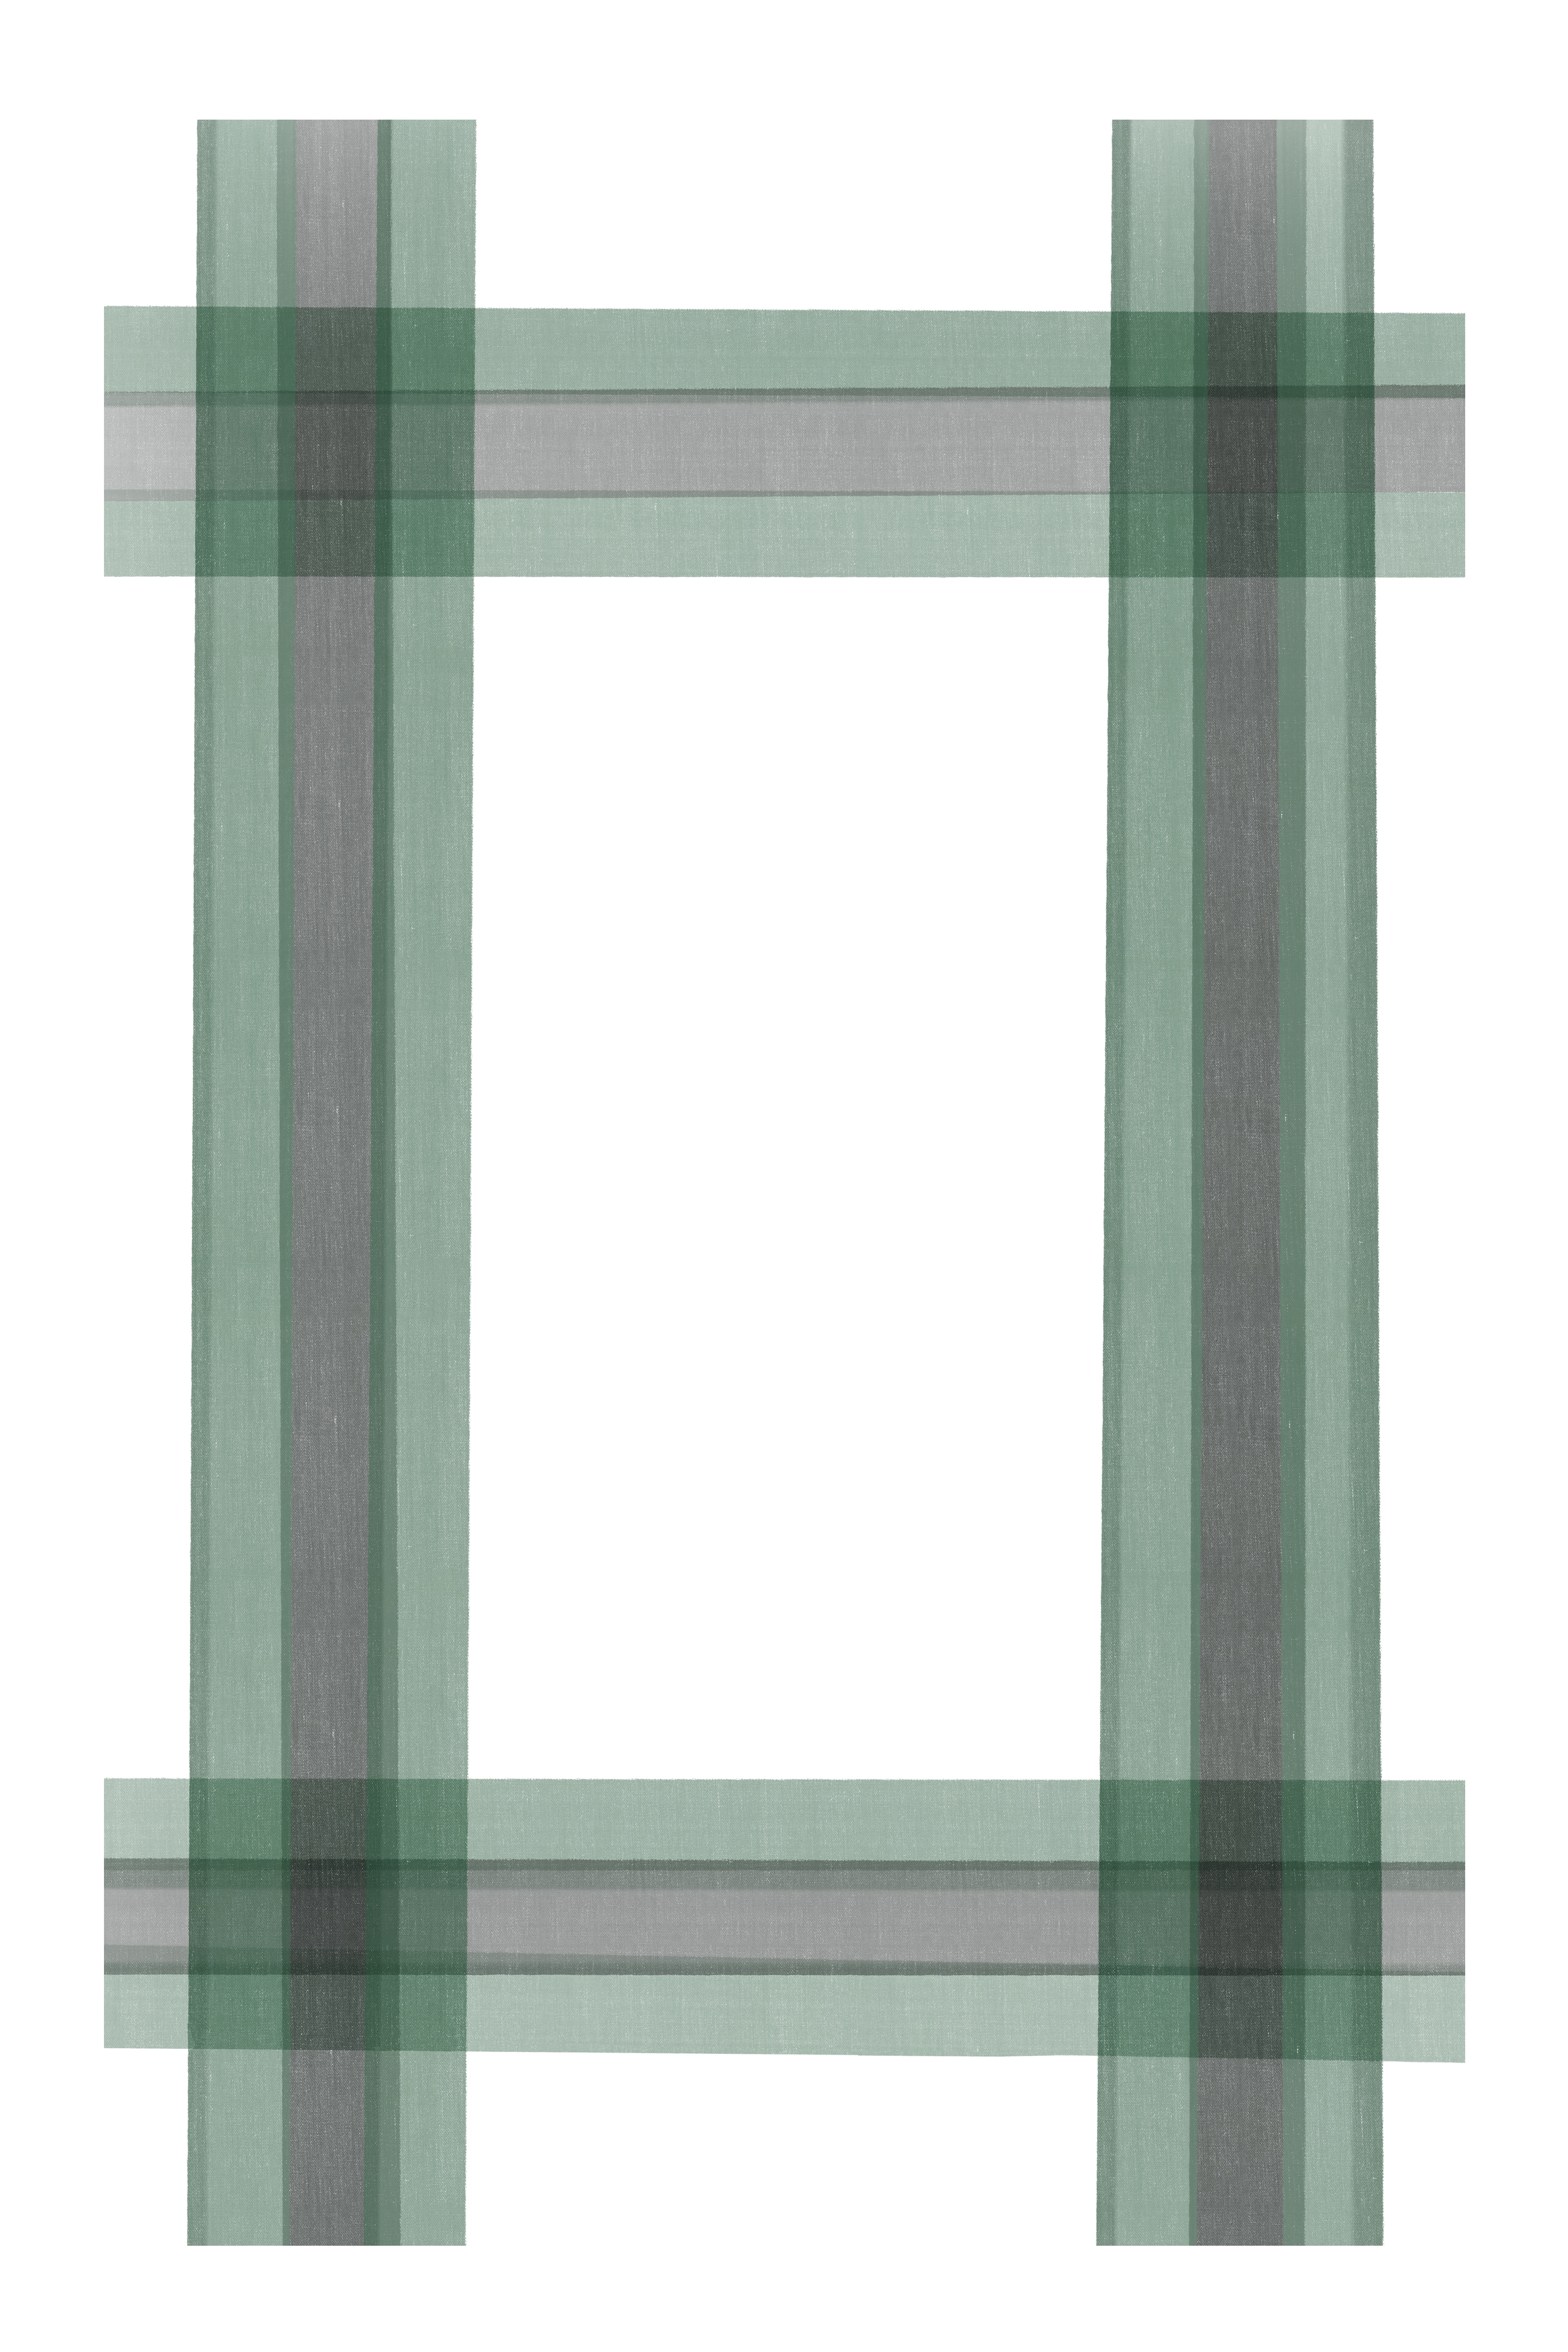
Simple Gray Stripe 18×27” template

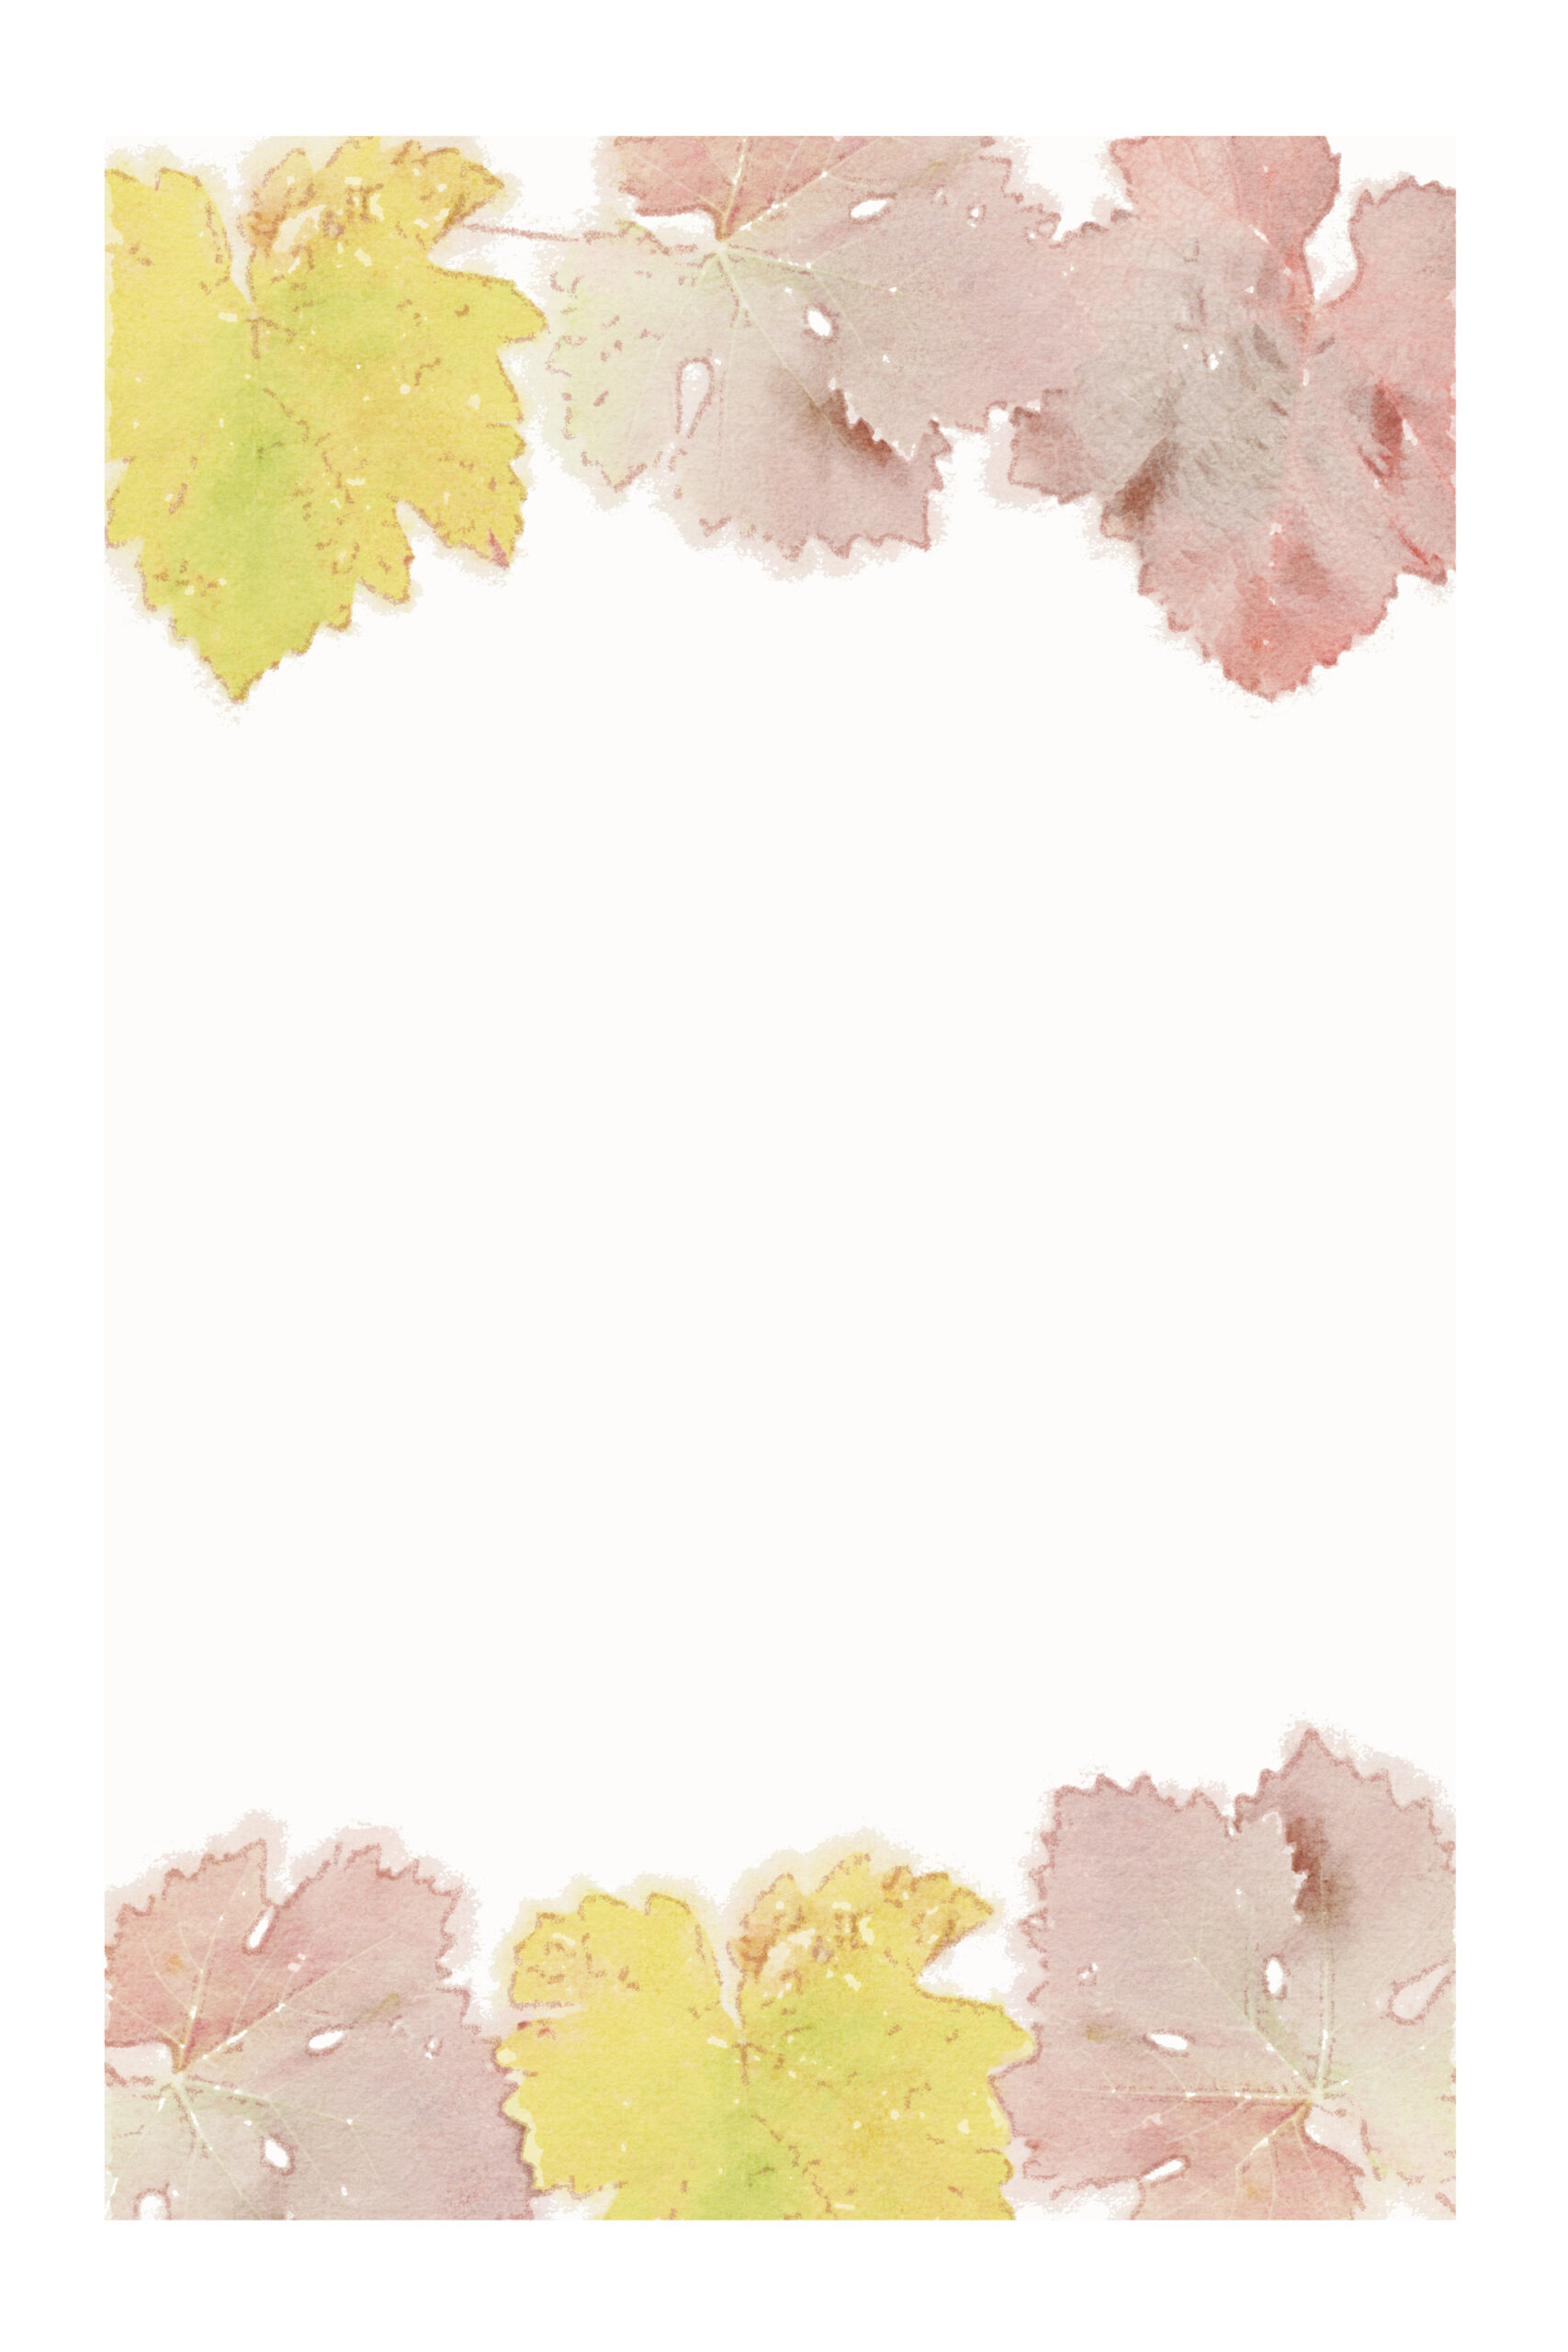
Watercolor Leaves 18×27” template

I added the recipe text to my tea towel templates with Photoshop, but if you’re not familiar with Photoshop, there are a few other ways to add font to a .jpg online.

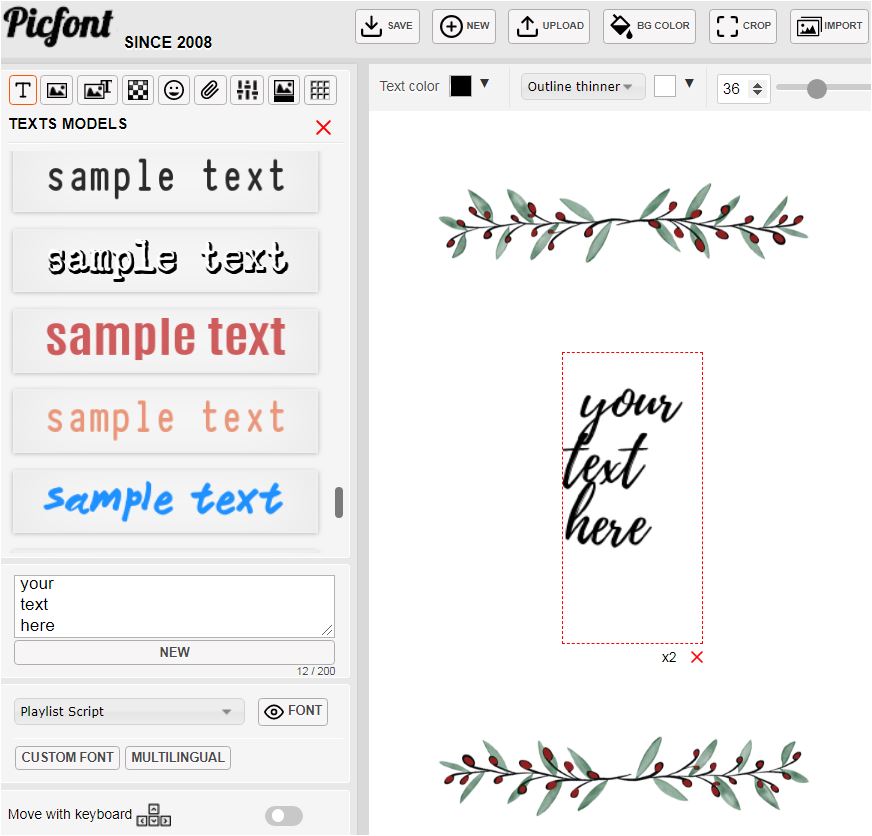
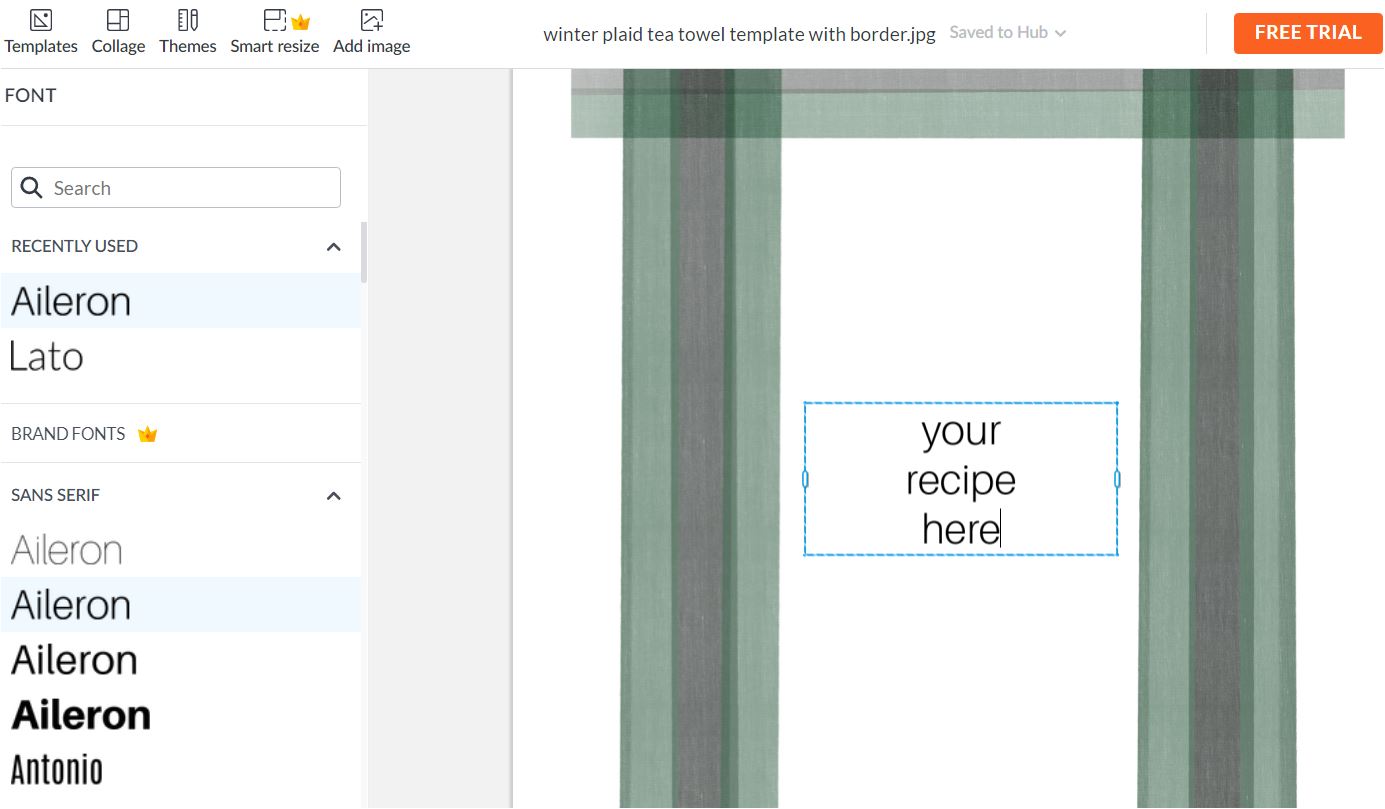
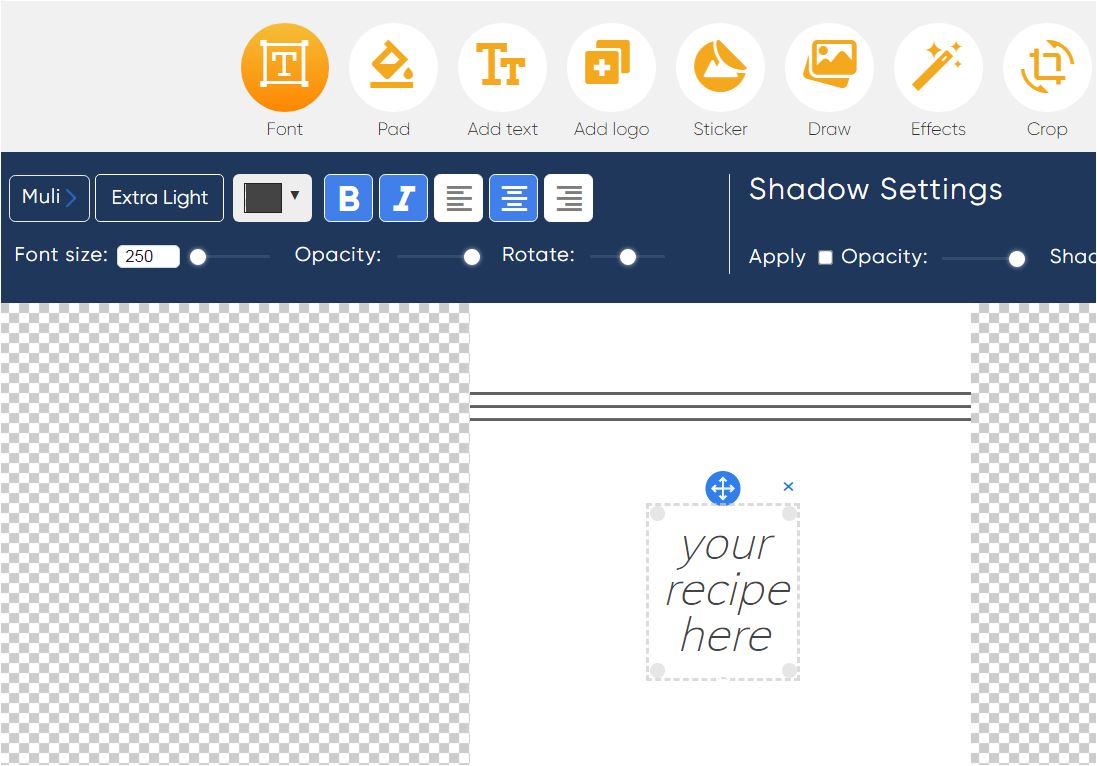
Try these three online programs for typing your recipe on .jpg on a desktop or laptop:

1. Picfont


2. Sign up for a free trial with PicMonkey

(skip the billing page)


3. Text2Photo online editor

Have fun being creative with your tea towels this season! Feel free to ask any questions in the comments!


Did you miss our previous article…
https://distancebetweenplaces.com/?p=328

Cane Accent Chairs

I was feeling the need for change in the living room so I bought myself some new accent chairs. I’d been searching for a few months having grown tired of my teal upholstered versions. I couldn’t find anything I really liked in an affordable price range until these caned armchairs popped up in my search, so I bought them for their casual style, versatility, and price.


They won’t live in the living room forever. I’ll probably move them to a bedroom in the future, but for now I like how light and natural they feel in this space.

caned armchairs / textured pillows

Cane and rattan have been trending for a few years, but cane furniture has been around for centuries! Because of the resurgence in popularity, we have more stylish choices than ever.

The style is lovely as a dining chair, office chair, or accent chair!

caned rectanglecane dining

rattan diningcushioned armchair


rounded back chairdining chair

black side chairjeannerete


patricia round backvelvet & cane

lula chairlandon chair

Did you miss our previous article…
https://distancebetweenplaces.com/?p=323

3 Furnace Installation & Repair Tips for More Attractive Home

Every homeowner craves for that beautiful-looking home. And this is why most people undertake home improvement projects. This may involve installing a new furnace, painting, updating lighting fixtures, and more. The furnace is one of the essential accessories for all homeowners and comes in handy in winter. If you’re seeking to repair or install a new furnace, there are various things to know.

 Check out furnace repair and installation tips for a better-looking home:

Prepare adequately

 It’s easy to call a technician when you have issues with your furnace. But, have you ever thought of preparing for repair or installation services? Well, this saves time and may save you a lot of money. For instance, if your furnace runs at the wrong temperatures, you may need to replace the thermostat. 

To understand the cause of the issue, go through the user manual, and acquire the necessary parts. Learn of the essential components of a conventional furnace and, if possible, have some spare parts at home. Once done, contact the Air Makers furnace repair team for a quote.

Your choice of repair company matters!

There are different furnace installation and repair firms. All offer various services, and it’s best to find one that suits your needs. Look for professionals extending a wide range of services and furnaces. If seeking to install a new furnace, engage a company with a wide variety. This makes it to choose what you need and get something to match your budget.

Also, the experience and reputation of the company is of the essence. Hire one that has been in existence for a long duration; this is why most homeowners hire furnace repair Toronto services. The firm has received good reviews from former clients and has a vast team of technicians.

Think of the cost

If installing a new furnace as part of your home improvement project, know that the success of the upgrades relies on your budget. Therefore consider the costs and do your math carefully. There are different units, and it’s best to go for one that you can afford. In case of repairs, acquire high-quality parts to ensure durability and saves on repair costs.

Also, be keen on furnace repair companies that charge hidden costs. Get quotes and compare this among different service providers. Get to know all the pricing details before engaging the team. Additionally, seek a company offering follow-up services; this saves a lot in case things go wrong.

What are the common furnace issues that require fixing?

Multiple signs may indicate a faulty furnace. For instance, there may be low airflow from your systemsignifying issues with your motor or blower. Strange smells are also common. These indicate a dirty filter or a failing burner.

 The burner may also not ignite properly, which may be a sign of a broken thermostat. Other issues include strange noise and the furnace running when it shouldn’t, and all require furnace repair services.

Final thoughts

 Furnaces are great additions to any home. A furnace will not only enhance the look of your home but will also raise its value. To install or repair the old one, only engage professionals and endure that the company is licensed. Also, avoid cheap parts, and purchase superior components to lower t cost of repairs.

Did you miss our previous article…
https://distancebetweenplaces.com/?p=228

Find Your Deck’s Flaws and Transform Them: Useful Tips to Beautify Your Outdoor

The deck is one of the most important parts of your home. It is a place where you can relax and enjoy the outdoors and entertain friends and family. But before it becomes everything that you want it to be, some things need to be done first. This article will give you useful tips on beautifying your deck so that it fits your needs perfectly!

1. Paint your deck a color that will stand out against the scenery

.Your deck should be a stand-out piece of your backyard, but it can’t do that if you paint it the same color as all the other parts. Paint it in an accent color or even just brighten up your old worn-down deck with some fresh coats of white to make sure that people are drawn to this area when they enter your yard.

Don’t forget about painting railings and posts either! If these areas look shabby now, no one is going to want them near their home either!

You might also consider using cedar for any exterior wood on your house because not only does this type of wood come naturally in beautiful shades of browns and reds already, but it’s very durable against rain damage too.

2. Add a bench or two to make it more comfortable for sitting and relaxing

A deck is typically a place where you can relax and enjoy the great outdoors, but if there isn’t any seating on your deck, then how are people supposed to do that? A bench or two will go a long way in making this area more comfortable.

You could also add some other little touches, such as potted plants for color and hanging flowers from railings so that it feels like part of the yard rather than just another room inside of your house.

3. Install a new railing system so you can enjoy the view from higher up

It is especially useful if you have a higher deck because it gives people the opportunity to see everything that your backyard has to offer. A railing with glass panels will also make this area seem more spacious, which can be perfect for entertaining guests or just enjoying some peace at home by yourself.

You could always go ahead and invest in an outdoor TV as well so that everyone who comes over has something fun they can do while hanging out on your deck!

4. Get rid of any clutter on your deck, including old clothes, shoes, and books 

It doesn’t matter how beautiful your deck is if there are clothes, shoes, and books scattered all over it because then no one will want to enjoy that space. If you don’t have the time or energy to make sure everything looks perfect on a day-to-day basis, just get rid of these items altogether, so they aren’t an eyesore anymore!

5. Keep your grill clean by using an outdoor cleaner every once in a while 

It is one of the most used pieces on your deck, so it deserves to be kept in tip-top shape. Using an outdoor cleaner will remove all residue that can build up over time and make sure that you enjoy cooking out every single time!

6. Place potted plants around to add some greenery to the space

A deck is a great place to enjoy the outdoors, but what if it has no greenery around? There isn’t any need to worry because there are so many different potted plants available that you can choose from. Choose one or two small ones and put them on your outside table!

When looking for flowers to plant in your garden, try taking some time out this year just for yourself by purchasing an herb planter! They look beautiful too, with little tags next to each herb, so people know what they’re called.

These were some useful tips for how to beautify your deck! If you follow these steps, people won’t even recognize this area as it once was before making any changes. The color options alone should be enough inspiration because there aren’t too many other colors besides neutral shades like browns or grays that would work well with a backyard’s natural scenery. Learn more from the experts of dock construction here

Did you miss our previous article…
https://distancebetweenplaces.com/?p=226

What You Need To Know About Humidifiers

The ABCs of Humidifiers

What is a humidifier? A humidifier is a machine that is designed to add moisture to the air inside your home. The purpose is to mitigate the negative effects of dry air on our health as well as on our home furnishings.

Infographic Provided by American Residential Services

Can you have too much humidity in the home? Yes, that’s why the Environmental Protection Agency (EPA) recommends that the humidity level not exceed 50%. Higher levels encourage the growth of organisms that aggravate allergies and asthma.

What are the benefits of humidifiers? A humidity level of 30% to 50% improves your family’s health, protects your furniture and floors, and may reduce your heating bills. The accompanying resource lists and explains these benefits.

What types of humidifiers are available? Humidifiers include steam vaporizers, evaporators, ultrasonic humidifiers, impeller humidifiers and whole home humidifiers. Only the whole home unit humidifies the entire house; the other four are portable models appropriate for single rooms. Read our resource to learn more about the various types of humidifiers.

Choosing a Humidifier

How do you decide which humidifier is best for you? If you wish to add moisture to a single room, then consider the following:

Do you plan to put a humidifier in a child’s room? A cool mist unit is safer than one that heats or boils water.Some models have settings for adjusting the humidity, while others do not. Decide if this is important for you.What size room do you plan to humidify? Read the specs to make sure you buy the right machine for your space.

To humidify your entire house, please consult with an air quality specialist. Only a professional can help you select the right whole home (central) humidifier for your needs and install it correctly.

Humidifier Tips and Tricks

Maintain the proper humidity. Be sure to add the right amount of humidity to a room or your home. Purchase a hygrometer to measure the moisture — be sure to keep the humidity level between 30% and 50%.

Use distilled water. Tap water can release minerals and other particles into the air that cause bacterial growth. Always use distilled, demineralized or purified water in your portable humidifier.

Keep your portable machine clean. Empty the water tank and clean the humidifier after every use. Standing water may contain mold or fungi. Scale, which may cause lung problems, should be removed by cleaning with water and vinegar, hydrogen peroxide, or a cleaner recommended by the manufacturer.

Regularly maintain your whole home (central) humidifier. Always follow the manufacturer’s instructions for replacing filters. Call a professional for regular maintenance per the manufacturer’s recommended schedule.

Replace the humidifier as necessary. Hard-to-clean deposits may build over time and encourage the growth of harmful bacteria. No machine lasts forever!

Scott Swisher is Vice President of Risk Management and Safety at American Residential Services/Rescue Rooter. Swisher has more than 29 years of experience with home service companies, including emergency HVAC service; plumbing, sewer and drain service; electrical; and attic insulation.

Did you miss our previous article…
https://distancebetweenplaces.com/?p=222

How to Choose Paint Colors for Your House


Are you ready to update your house? There are plenty of home improvements you can make, big or small, that are sure to leave an impact. If you’re looking to refresh your house with paint, the first thing you have to do is choose some potential colors. Easier said than done, right? Selecting a color palette for your home can seem like a daunting task because of the endless options out there.

Here’s the best process for choosing paint colors for your home.

Pick out a few color options. The first step in deciding which color(s) are suitable for your home is to choose a few different colors. It sounds silly, but this first step is crucial on the path to deciding which color is right for you. You’ll narrow down the options without completely settling on one particular color from the start. Then, consider the space you’re looking to paint — is it indoors or outdoors? What does the furniture look like? Is there a lot of natural light in the room? Are there any colors or color families you can’t stand? What colors make you happiest? The answers to these questions will point you in the right direction for the next steps.

Know a little color theory. Consider your reason for having your home painted. Is it to make your home look bigger? Perhaps it’s so your home can feel cozier. Whatever your reason for painting is, there’s a paint color to match your goal. Generally speaking, crisp whites can help open up a space, but these hues can also make a room feel cold and lifeless. On the other hand, warm colors can make any space in a home feel welcoming, while soothing cool pastels can make a space more relaxing. Think about the atmosphere you’re trying to create and let that inspire your color choices.

Test multiple paint swatches. Whether you’re painting indoors or outdoors, professional house painters in Ashland, MA, say it’s always a good idea to do a color swatch test before making the final decision. You can easily get a sample size of the color you’re considering from a local paint or hardware store. When you swatch, make sure to test the color in multiple areas, so you get a good idea of how the color looks in shadow versus how it looks in the light. Additionally, make sure to swatch a large enough space (about a one-foot by one-foot area will do), so you have a better idea of how the color will look when you commit.

Use an online color visualizer. Perhaps the most challenging part of choosing a color for the interior or exterior of your home is knowing what it will look like when the job is done. Color swatching can get you pretty far, but you still won’t know what the finished product will truly look like. Fortunately, there are a variety of free tools online that can help you picture any color in your space. All you have to do is upload photos of your room, choose the color you’re considering, and the visualizer will provide you with a picture of your revitalized space.

Decide on a paint finish. One of the last steps in choosing a paint color for your home is settling on the type of finish you want. Most paints are available in flat, matte, eggshell, satin, semi-gloss, or high-gloss. The space you’re having painted can help determine the finish you choose, as can your personal preferences. Homeowners often opt for a long-lasting finish like eggshell or satin in high-traffic areas because it is scrubbable and can withstand the test of time. If you’re unsure which finish is right for you, a painting professional can provide you with more information.

And if you’re still stuck on what color paint to choose for your home makeover, it might be time for a consultation. Professional painters and interior decorators can usually make color recommendations for any space in your home. Remember that you don’t always have to go with what’s on trend. Follow your gut and choose the colors that make you feel the most content.

Did you miss our previous article…
https://distancebetweenplaces.com/?p=220

How Much Does Exterior House Painting Cost?

When your house needs a new coat or two of paint, it can be a big project. Homeowners can head over to Angi, formerly Angie’s List, to find out more about the price it will cost. However, there is no one set price for this type of job. A lot depends on your house itself as well as the region that you live in. Urban areas virtually always cost more, and rural areas may have an extra charge because they are far away. 

Exterior House Painting Prep

A big part of the cost to paint the exterior of a house depends on the prep work required before the house is actually painted. That prep work often includes getting rid of the paint that was there before if it’s chipping and to fill in any holes and dents. If the house needs a lot of prep work, this alone can be more than half of the labor cost of the entire project. If there is little prep work that needs to be done, this part may only cost a couple to a few hundred dollars. However, on a house that is 2,100 square feet that needs a lot of prep work, the cost can be $1,000 or more.

If your home needs window glazing or caulking, this will add even more to the price. You can expect an average-sized house to cost anywhere from $2,000 to $4,000 depending on the prep work needed, the size of the house, and the kind of exterior house paint you want to use. 

The Square Footage

The square footage of your house is one of the major determiners of how much the paint job will cost. If your home needs to have window caulking and pressure washing, and paint that is in average condition, you may pay about $0.50 per square foot for the prep work. If you need a little scraping and/or power brushing to get rid of paint in bad condition, you may pay anywhere from $0.50 to $1 for each square foot for the prep work. If the paint is in very bad condition, you may pay as much as $2 per square foot for the prep work.

Then when you get two coats of paint on your house, you can expect to pay about $1 to $2 per square foot. All total, $3,000 is a good average amount for exterior house painting. The price can be up to $10,000 if your house is larger than average and you have paint in poor condition. 

Want to know how much your exterior painting project will cost? Angi makes it easy for you to find local exterior paint professionals and get multiple competitive quotes. Estimates are generally free, and you are under no obligation to use their services. 

Did you miss our previous article…
https://distancebetweenplaces.com/?p=217