post

Benefits of Green Waste Removal

Whether you’re doing a home remodel, cleaning up your yard, or simply making some greener choices at the store, there are many benefits to going green. Using recycled materials, reducing waste production, and embracing smarter recycling practices can make your project more eco friendly and less expensive.

Green waste is typically composed of garden refuse such as grass clippings and leaves, along with kitchen scraps like food scraps, coffee grounds, and eggshells. Green Waste Collection Mandurah can be processed at specialized facilities to produce biogas.

Green Waste Removal

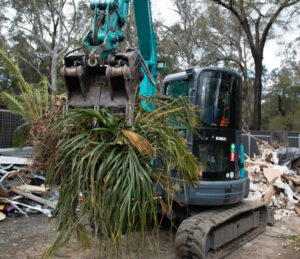
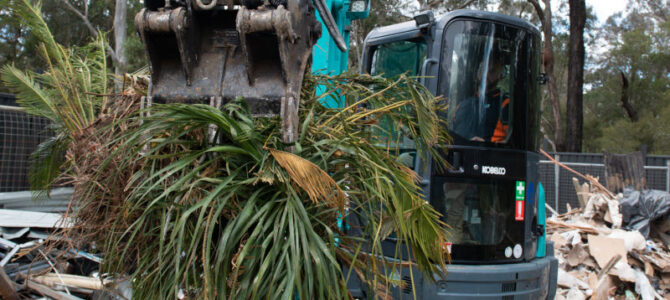
When a tree becomes too large for its space, or has suffered from damage or disease, it may need to be removed. Removing a tree is a significant undertaking, and requires the services of professional arborists. The first step in the process is to assess the condition of the tree, and determine whether it is safe to remove. Once the assessment is complete, the next step is to gather the necessary equipment and materials. This includes tools such as pruning shears, loppers, and a garden rake. In addition, a wheelbarrow or sturdy cart is needed to transport the debris away from the site.

The green waste removal process begins by trimming the larger branches and trunks of the tree. This helps to reduce the overall weight of the debris, making it easier to move and transport. Once the large sections of the tree are removed, the crew will then move on to the smaller twigs and leaves. This material can then be sorted and bundled for recycling or composting.

Regular green waste removal is vital to the health and well-being of your trees. When left to accumulate, this organic material can create a moist environment that can cause root rot and fungal diseases in the surrounding soil. The regular removal of this debris also helps to maintain proper airflow and sunlight around the base of your trees, ensuring their long-term health and vitality.

When choosing a green waste removal company, it is important to select one with a good reputation and extensive experience. Make sure to find out how long they have been in business, and ask for references from previous clients. Also, look for a company that offers a wide range of waste management services. This will help to ensure that you get the best value for your money.

While it is possible to do the work yourself, a green waste removal service will save you time and effort. This is especially true if you have a large amount of debris to dispose of. Hiring a professional will also ensure that all necessary safety measures are taken, and that the work is done correctly.

Tree trimming is a crucial part of green waste removal. It is the practice of removing branches that have become overgrown in order to maintain a healthy, balanced tree and promote proper growth. It also enhances a tree’s appearance and helps to improve the overall landscape. It can help to prevent diseases, insects, and other problems that can interfere with a tree’s health.

Unlike pruning, which is more focused on the health of a tree, tree trimming is mainly about aesthetics. It is important to know the difference between the two services because they are very different in their purposes and how they should be conducted.

Aside from enhancing a landscape’s beauty, tree trimming can also help to reduce the risk of damage to your property or home during a storm. Overgrown branches can rub against or break your home’s roof, knock over fences, or even hit power lines. Regularly trimmed trees can minimize this risk, so your family and pets will be safe from falling limbs during strong winds or heavy rainstorms.

Another benefit of regularly trimming your trees is that it will allow them to absorb sunlight better. Long branches can block out the sun’s rays, which can affect how well they grow and lead to an unsightly look. With proper pruning, you can remove diseased, dead, or broken branches that may be preventing your plants from getting enough sunlight to grow properly.

Lastly, tree trimming is an important aspect of green waste removal because it is used to turn the debris into compost that is then donated to local farms and gardens for use in growing new trees, flowers, and vegetables. It is a great way to make sure that your green waste doesn’t end up in landfills, where it can harm the environment.

Green waste is the biodegradable material that comes from trees or plants. It can include grass clippings, shrub and yard trimmings, twigs, leaves, palm tree fronds, brush, logs, and stumps. This type of rubbish is different than your typical garbage, as it can be turned into mulch or compost. This is beneficial because it reduces the amount of waste in landfills and helps with carbon sequestration.

Generally, residents can place green waste into paper lawn and leaf bags or bundles for curbside collection. However, it’s not recommended to place more than 10 items (bags or bundles) at a time. Individuals can also burn their green waste after obtaining a permit or pay landscaping companies to manage it. In addition, residents can drop off their green waste at privately-run facilities that accept it for a fee.

While some municipalities have green waste programs, many of them don’t. In some instances, green waste may be collected by private junk removal services. This can be a great option for those who don’t have the space to store it, or who prefer to avoid the hassle of taking it to a green waste facility themselves. The service can also make sure that the waste is handled responsibly, which helps the environment.

In a world grappling with environmental issues, education emerges as the beacon of hope. It empowers individuals to embrace sustainable practices and create a profound impact on the environment. Tree education ignites a passion for environmental conservation, fuels curiosity, and nurtures a deep respect for our planet.

The provides teachers and students with free online tools to quantify the dollar value of ecosystem services provided by trees on school grounds or in their community. These activities integrate science, economics, geography, and language arts to address cross-curricular learning standards.

Green waste is compostable and includes grass clippings, weeds, leaves, shrub and brush trimmings, and fruit or vegetable scraps, along with coffee grounds, egg shells, and other organic matter from home or commercial kitchens. It does not include wood, bark, dirt, hay, or large branches, which are considered brown wastes and not part of the green waste collection.

To learn more about recycling green waste in your community, contact the They offer four different curbside collection programs, including Green Waste, Christmas Tree Collection, and Leaf Collection.

As a local, family-owned business, strives to be environmentally responsible. We recycle as much of our green waste as possible, and we encourage our customers to do the same. Green waste contains a lot of valuable nutrients that are good for the soil. It also helps keep our community healthy by reducing the amount of trash we produce.

We participate in several yearly tree planting events at area schools through our Learning with Trees program. These events provide an exciting way for kids and their families to get outside and take part in an ecologically friendly activity. We also work closely with the EPA’s i-Tree program to help students learn about the value of trees and how they can improve their own communities through tree planting.

For 29 years, the has brought hands-on environmental education to schools through the power of trees. When students plant a tree on their school grounds, they leave behind a legacy that they can share with future generations. Studies have shown that children who are exposed to more nature perform better in school, and a well-treed campus can have numerous other benefits, from improving student health to lowering stress levels and boosting focus.

post

Cabinet Refinishing – An Inexpensive Way to Refresh Your Kitchen

San Jose Cabinet Refinishing is the process of redoing the finish on existing cabinetry. It could also include upgrading functional parts like hinges and drawer slides.Cabinet Refinishing

This can be a great option for homeowners who want to change the color of their cabinets. It’s important to note that refinishing won’t work on split Rigid ThermoFoil doors.

Cabinet refinishing is an inexpensive way to refresh your kitchen. It costs about 40% less than replacing your cabinets, and it can be done in a day or less. However, it’s important to note that refinishing is a surface-only update and doesn’t affect the layout or function of your cabinets. If you want to make significant changes, consider refacing instead.

Refinishing is a process that involves cleaning and degreasing the wooden surfaces of your cabinets. It also includes the use of a wood filler to repair any cracks or holes in the cabinets. Once the cabinets are cleaned and sanded, they are ready to be painted. While refinishing can save you money, it isn’t as durable as painting or staining. It can also be time-consuming and tedious.

A good painters will ensure your cabinets are properly prepared and will use high-quality paint. The right paint for cabinets will be durable, dry quickly and resist chipping and peeling. It’s a good idea to use a primer to help the new paint adhere. You can choose from oil-based or water-based primers. When choosing a primer, look for one that is specifically formulated to withstand kitchen use.

To get the best results, you should always choose a color that matches your existing fixtures and appliances. This will help your new finish blend in with your home and create a consistent, modern look. You can also opt for a darker stain to enhance your cabinet’s natural features.

Before you begin the project, it’s essential to have your cabinet doors flat and a drop cloth on hand to protect the counters and backsplash. It’s also a good idea to wipe down the cabinet surfaces with a chemical deglosser. This will remove any cooking residue and help the new paint adhere.

It’s essential to follow all the safety precautions when working with power tools and sanding equipment. This will prevent injury and damage to your property. It’s also a good idea o wear rubber gloves and masks. Lastly, be sure to store all of your tools in a safe place when you are not using them.

Time

Cabinet refinishing is the process of working with existing cabinets to stain or paint them a new color. This process can take a long time and is best left to professionals. It requires a lot of preparation and patience. It is important to have the right equipment and materials to make the job go as smoothly as possible. If you don’t have the proper tools, it will take much longer and could result in a poor quality finish.

The first step in the refinishing process is stripping the old paint. This can be done with chemical strippers or sanding. The stripper should be brushed on and allowed to soften the paint before it is scraped off. It is important to wear the proper safety gear when using strippers such as gloves, eye protection, and a mask. Chemical strippers are caustic and should be used in a well-ventilated area. Stripping the cabinets thoroughly saves a lot of sanding time in the end and also helps ensure a smooth and even coat of paint.

A good quality paint job will require a few days to complete. This is especially true if the contractor is using a solvent-borne lacquer that produces a lot of volatile fumes during application. This type of finish can take three to four days to dry completely. Homeowners may want to consider renting a small portable fume hood or closing off the kitchen during this time.

Another option is to use a water-based lacquer. This is less toxic and takes about two to three days to dry fully. Water-based lacquers are also more environmentally friendly than solvent-borne finishes.

When choosing a contractor for the job, homeowners should ask them how many years they’ve been in business and how much experience they have with cabinet refinishing. They should also ask for references and a portfolio of previous projects.

A professional refinisher will have a large variety of tools and supplies, including fine-grit sandpapers and finishing sprays. They’ll likely also have access to high-quality paints that are not available at big box home improvement stores. In addition, they’ll be able to recommend specific products that will work best for the project.

Materials

Refinishing requires a lot of materials and equipment. This includes the right paint, primer, sandpaper, a high-quality sprayer and a variety of brushes. You also need wood filler to cover any holes or nicks in the cabinetry before painting. A tack cloth is a must to pick up any remaining dust and debris after sanding.

The best choice for cabinet refinishing depends on the material and condition of the cabinets. Some types of cabinets can be refinished, while others need to be refaced. Refacing is the ideal course of action for cabinets that are worn and outdated but are functionally in good shape. It is also the best option for addressing issues like scratches, dents and faded colors.

Cabinet refacing is the process of covering or replacing the existing cabinet doors and drawer fronts with new material. The result is a completely new look for the kitchen without spending a fortune. It’s an option that is especially suited for homeowners with boxy, simple cabinet designs. In most cases, refacing can be completed in about a week.

A popular option for refacing is laminate, which comes in many solid design options and works well on cabinet boxes with straight lines. It’s a great alternative to refacing with wood, which can be difficult to do on the corners of the cabinet boxes. If you want to add some more flair to your cabinets, you can also use wood veneers for refacing.

These are thin sheets of real wood that you can attach to the surface of the cabinets to give them a custom appearance. They’re available in a wide range of wood species and grades. Some refacing companies offer pre-cut and pre-glued wood veneers that are much easier to work with than cutting and applying individual pieces of wood.

The cost of the wood veneers will depend on the type you choose. You’ll also need to purchase a kit that contains the necessary application adhesive and instructions. It’s a good idea to visit local cabinet makers and remodelers to get an estimate on the total cost of the project before you begin. These professionals have already shopped for the best products and prices and may have access to discounts that aren’t available to the general public.

Safety

If you’re considering a cabinet refinishing project, it’s important to take safety measures into account. First, make sure to cover the floor and countertops with drop cloths to protect them from paint splatter. You should also cover any appliances near the area you’ll be working on to protect them from dust and sanding particles. Additionally, you’ll need to cover any furniture near the cabinets you’re painting with plastic covers.

Next, thoroughly wash all surfaces that will be painted with a degreasing cleaner. This will remove any grease or wax that can prevent a clean, smooth finish. If you have very dark, glossy surfaces, you may want to use a stronger cleaner like trisodium phosphate (TSP), which is available at most hardware and paint stores. TSP can be toxic if inhaled, so it’s important to wear a respirator and follow all the safety precautions when using it.

When sanding the existing surface, be very careful not to go too deep or you’ll risk damaging the wood underneath. A good rule of thumb is to sand down to the original stain, then lightly sand again before applying a new coat of primer. Finally, it’s important to keep a tack cloth handy to wipe away the sanding dust before applying your final coat of paint.

Another consideration when refinishing your cabinet doors is whether or not the material is suitable for refinishing. If they’re made from thermofoil or laminate, then you won’t be able to refinish them because the surface is not porous and will not accept paint well.

A solid-color refinish is also usually not possible if your cabinet doors are made from medium-density fiberboard (MDF) instead of real wood. This is because MDF can’t be stained to look like wood; it only looks like wood when painted.

If your doors are MDF, then you’ll need to restyle them before you can refinish them. This means replacing the hinges, handles and other hardware and possibly even changing the style of the door panel. This is a much more involved project than simply repainting and can often require hiring a professional.

post

What Does it Take to Become an Electrician?

Electricians need a diverse set of skills to work safely and effectively. They should enjoy a challenge and be comfortable working in various environments.Electrician

Electrician Boca Raton will be able to explain their approach and its reasons. This helps to build a trusting relationship and ease any concerns from clients.

The educational requirements for an electrician vary by state, but usually include a high school diploma or equivalent and completion of a formal apprenticeship. Many vocational and trade schools offer financial aid options, including grants, scholarships and student loans. Filling out the FAFSA (Free Application for Federal Student Aid) form is a good idea before attending any trade or vocational school to determine the level of financial assistance you might qualify for.

Most electricians start as registered apprentices in training programs that are approved by the local union or government. Initially, they perform very basic tasks and gradually gain more responsibility as they refine their skills. Depending on the program, it may take up to four years to complete an apprenticeship and become a licensed electrician.

Electricians are responsible for installing and maintaining the wiring, systems and fixtures in buildings. They must follow all electrical codes and safety regulations to ensure that they do not cause fires or other hazards. This job requires extensive knowledge of electrical components and circuits, including how to read blueprints and diagrams, as well as logical problem-solving skills.

In order to work safely with electrical wires, electricians must have normal color vision to be able to discern colors that are used in wiring. They also must be physically able to stand for long periods of time and climb ladders or scaffolding. The ability to make quick calculations using standard equations is also important for electricians.

The demand for electricians is expected to grow due to the ongoing construction of new homes and businesses, as well as the need to replace older electricians who retire or leave the industry. Alternative energy sources such as solar and wind power will also require more electricians to install and connect these systems to the electricity grid.

Continuing education is recommended for electricians, as there are always new technologies and developments that affect the field. In addition, specializing in a specific aspect of electrical work can increase employment opportunities and command higher pay rates. Examples of specializations include residential, commercial and industrial electrical work, as well as life safety and security systems.

Experience

Electrical work is a complex job that requires a wide range of skills. As an electrician, you must be able to think on your feet and troubleshoot electrical problems quickly and efficiently. You must also be able to follow all safety guidelines when working with electricity. If you have these skills, a career as an electrician could be the right choice for you.

In addition to the technical skills that you learn through apprenticeship or trade school programs, an electrician needs several “soft” skills. These are the abilities that help you communicate effectively with customers, manage projects well, and stay up to date on technology trends.

Attention to Detail

One of the most important skills for electricians is the ability to pay close attention to details when performing a task. This is essential because mistakes can be dangerous when working with electricity. It is also necessary for electricians to be able to read blueprints and understand all electrical codes.

Collaboration and Communication

Electricians often work with other construction professionals, including architects and engineers, on new projects. They must be able to collaborate effectively with these colleagues to ensure that the electrical systems are designed properly and meet all specifications. They may also interact with clients or end-users of the electrical system, offering guidance on proper usage, safety precautions, and energy-saving practices.

Physical Stamina

Because they must stand for long periods of time and climb up and down ladders, electricians need to have physical stamina. They also need to be able to lift heavy objects and squeeze into tight spaces. This type of work can be physically exhausting, so it is important for electricians to maintain a healthy lifestyle and take regular breaks when needed.

Aside from physical stamina, electricians need to have good mental agility. They must be able to solve complicated technical issues in the field and remain calm when faced with emergency situations. They must also be able to adapt to changing circumstances and work environments, such as when environmental regulations require them to update electrical systems to improve energy efficiency.

Licenses and Certifications

If you’ve ever dreamed of becoming an electrician, then you should know that there are specific requirements that must be met in order to get licensed. This includes the completion of a formal apprenticeship program under a master electrician, earning a certain number of on-the-job training hours (typically around 8,000), classroom education and passing an exam to become a journey electrician. This is a demanding program that requires an immense amount of work, but it offers stability and good pay once you’re licensed.

Certification programs can also help you move further along in your career, adding to the skills that you have and allowing you to do more specialized work. You can even become certified in areas such as electrical safety, arc flash analysis, cable splicing and more. These types of specialized training are a great way to add value to your resume and can give you an edge in the job market.

Another option for future electricians is to go through community college and obtain an associate degree in electrical engineering or technology. These two-year degrees offer a lot of hands-on experience and can help you get closer to your apprenticeship program. They are also a great stepping-stone to a bachelor’s degree.

The Armed Forces also provide excellent training as an electrician. This can be very valuable to someone who wants to get their foot in the door and begin a career immediately. Many of these courses cover topics like wiring, repairing small electronics and electrical devices, drafting diagrams and much more.

There are also many online colleges that offer courses in the same field, offering students the ability to learn from anywhere in the world and get a well-rounded educational experience. It’s important to do your research and find a school that offers the right type of instruction for you.

Lastly, you should always be aware of the state and local licensing requirements in your area. Most states require that you have a license to work as an electrician, and there may be additional requirements for your specific jurisdiction. You should also look into the recommended insurance policies that you will need to carry, which typically include general liability, worker’s compensation and more.

Insurance

Working with live wires and power tools puts electricians at a high risk of being injured. And while no one can completely eliminate risk, insurance coverage gives electricians the peace of mind to operate their businesses knowing they have protection.

General liability insurance is an essential coverage for any electrical contractor. This policy protects against third-party bodily injury and property damage claims. For instance, if you or one of your employees accidentally damages a client’s possessions while working on their electrical system, the liability policy will cover repair costs and any settlements awarded against your business.

Another important type of electrician’s insurance is professional liability insurance, which is also known as errors and omissions (E&O) insurance. This type of policy covers you if a customer alleges that your work was substandard or didn’t meet industry standards. It can also help pay for legal fees if you are sued over an alleged error.

Workers’ compensation insurance is another vital insurance for electrical contractors. Suppose an employee falls off a ladder or gets an electric shock while working on a jobsite. A worker’s comp policy can cover medical expenses and lost wages. And if the employee needs to see a specialist, the policy may also pay for those medical expenses.

Lastly, an inland marine insurance policy is an option for electricians. This type of insurance protects equipment and supplies from theft or damage while in transit to and from a job site. It may also include coverage for any tools and equipment left behind at a job site until the customer returns to pick them up.

Farmers offers a variety of insurance policies that can help protect an electrical contracting business. These include business owners policy (BOPs), general liability insurance, workers’ compensation insurance, commercial auto insurance, builder’s risk insurance, and equipment and tools coverage.

post

Chimney Cleaning Methods

Chimney cleaning is messy and requires Chimney Cleaning Baltimore. Protect carpet and furniture in the room with the fireplace by laying down a drop cloth or taping plastic over it.

You’ll need a ladder, chimney brush, pull ring, and weight (20 lbs minimum). Open the damper and remove the chimney cap.

chimney cleaning

A fire in the fireplace creates warmth and ambiance in a home. It’s a place where families gather to chat, play games, or enjoy a movie together and is an important part of many holiday celebrations. But the fireplace can be dangerous if it’s not properly cleaned and maintained. A dirty chimney can lead to toxic gasses and creosote build-up, which can lead to a chimney fire. Chimney fires are a common cause of house fires, and many people don’t know that they can be prevented with regular cleanings.

The best way to clean a chimney is with a wire chimney brush, which can be purchased from most outlets that sell wood-burning fireplace equipment or at most major retailers that carry fireplace supplies. It’s important to select a brush that is the right size to fit the flue of your fireplace.

Chimneys are designed to allow smoke and dangerous gasses to escape the firebox of your fireplace or wood stove, and to prevent carbon monoxide poisoning in the home. But the chimney is also responsible for safely transferring the heat of the fire to the outside air, and it needs to be free from obstructions. An obstructed chimney can choke off the flow of air, which leads to overheating and can damage the inside of the chimney liner.

The most common sign that it’s time to clean the chimney is a layer of soot on the interior walls of the fireplace and flue. To determine if the soot is thick enough to require a cleaning, experts suggest shining a flashlight into the fireplace and using a fireplace poker to scratch the surface. If the scratches leave a matte black finish, the chimney should be able to be cleaned by a DIYer, but if the scratches reveal a shiny, tar-like substance, it’s time to call a professional.

If you’re planning to clean the chimney yourself, it’s important to prepare the work area with drop cloths or tarps to protect flooring and furniture from soot and dust. Wear rubber gloves, eye protection and a face mask to avoid inhaling the dust and vapors. Make sure that the chimney is cool before starting the cleaning process, and open a window or door to let pressures equalize.

This method of chimney cleaning uses a brush with rods to clean the entire length of the flue from top to bottom. It requires a ladder and is usually done during warm weather. Before you begin this cleaning process, lay down drop cloths to protect the floor and furniture in the room where the fireplace is located. Next, grab a ladder and all necessary tools and climb on the roof to access the chimney. Make sure that the fireplace is not burning a fire, and remove the chimney cap from your flue.

Using this technique, you will need a flexible chimney brush with detachable rods. One person should go up on the ladder to the roof, and the other person should wait below with the chimney brush in hand. As you both work together, you should pull the brush up and down to scrub the walls of the chimney flue. If you think that the chimney is not getting completely cleaned, add more rods and repeat the process. When you are finished, use a flashlight to look inside the flue and confirm that it is clean.

The main issue with a chimney that is not regularly cleaned is that a black tar-like substance called creosote builds up on the walls of the chimney or flue. This creosote is flammable, and can cause a chimney fire that may send smoke or carbon monoxide into the home. The chimney also can crack or leak when the creosote becomes too thick to allow wood to burn safely.

During the cleaning process, you should look for issues such as cracks or damage to the chimney liner, the chimney crown, the damper and the fireplace opening into the house. If you notice any problems, contact a chimney sweep or repair specialist. Chimney fires can be very dangerous, and if not correctly handled, they can destroy your chimney and cause the loss of valuable items. It is also important that you do not attempt to clean your chimney if there are any hot embers or soot that remain in the flue.

In this method, a chimney brush is attached to a rod that has a weight at the end. This is used to control the brush as it moves up and down the length of the chimney flue. The weight should be of a size that it cannot swing free and cause damage to the flue liners. A solid 15 to 20 pound weight is usually adequate. To use this cleaning method, you will need to be able to climb on the roof to access the chimney. From there, you will need to assemble the rope, pull weight, rings, and chimney brush. After that, you will simply begin lowering and raising the chimney brush to scrub thoroughly the walls of the flue. Continue doing this until the entire chimney flue is clean.

Once you are finished with this method, you will need to return the supplies back into your satchel and climb down the ladder. This cleaning method requires a little more time and effort than the first two, but it is very effective at removing hard to remove creosote from the walls of the chimney flue. The other big advantage of this cleaning method is that it can be done without the need for any chemicals.

After the chimney is cleaned, you will need to inspect it for any problems that may have occurred during the sweeping process. This is important because a damaged or deteriorated chimney can pose safety hazards that could lead to house fires, water leaks, and structural instability. You will also need to check for any animal nests and debris that have been blocked off of the chimney opening.

Regardless of which cleaning method you choose, it is always a good idea to cover any surfaces that are exposed to soot and ash. This will protect them from staining and will also prevent any soot particles from escaping during the cleaning process. Lastly, it is always a good idea to use a flashlight or mirror (if you are on the roof) and a mirror (if you are on the ground) to inspect your work and make sure that all areas of the flue are clean.

In this method, you work from the fireplace opening inside your home to the top of the chimney with a brush and rod. This is a much safer option than the top-down rod cleaning method, since it eliminates any need for ladders or rooftop work. However, it can still be quite messy since you cannot seal off the firebox opening, and soot, ash and creosote may get on any nearby flooring or furniture. You’ll need to use plenty of tarps and drop cloths to keep the mess under control.

You can use either a metal or a poly chimney brush for this method, but you’ll need to make sure that the chimney brush matches your flue size and shape. It should also be able to handle the temperature and corrosiveness of your chimney lining. You’ll also need to have a set of extension rods, which will give you greater reach in your chimney. The best type of extensions are telescoping ones that can be adjusted to your height and that have a locking feature.

Start with a thorough inspection of your chimney and the interior of the firebox. This will allow you to see if your chimney is clean and assess the level of soot. This will help you determine the cleaning intensity needed and how long you should spend working on the chimney.

Next, use your chimney brush to remove any accumulated soot and ash from the bottom of the fireplace and from inside the flue liner. Continue scrubbing until your chimney is as clean as it can be without professional intervention. After scrubbing, use your chimney rod to sweep the rest of the way up through your chimney.

After you’re done, remember to take the chimney brush and rods down carefully to prevent breakage. You should be able to disassemble the rods in one piece or in several parts, depending on the length and design of your chimney. Be sure to wipe down the inside of the chimney before reinstalling it and before lighting your first fire. If your chimney has a double-flue or is prone to leaks, you may need to install a waterproof chimney cap to prevent water from entering your house and damaging the chimney walls.